StakeNet Staking – Everything You Need to Know
StakeNet staking is an innovative take on the Proof of Stake consensus algorithm. Trustless Proof of Stake, TPoS for short, allows crypto investors to keep their coins safe in cold storage, while at the same time earning them a return via staking. The uniqueness in this method of staking comes from the fact that it enables securing the network, while being offline and furthermore, opens up the possibility to create a commission-based revenue business by staking other people’s coins.
Another innovative solution that’s under development is Cross Chain Proof of Stake (CCPoS). The idea is to allow staking Stakenet coins and receiving your rewards in the form of other currencies. This new technology opens up a lot of flexibility options for users and will encourage further decentralization and the creation of cross chain masternodes and autonomous switching of staking rewards.
In this article, you will find the necessary information to begin your StakeNet staking experience, whether on your own or via a TPoS merchant, and learn the specifics of the coin’s technology.
Pros & Cons
- Innovative Cross Chain Proof of Stake consensus algorithm
- SegWit enabled blockchain with support for Lightning Network
- A unique project with a high ROI percentage
- Very detailed documentation, allowing for high levers of transparency
- To use TPoS you need to search for a merchant on the official Discord channel which is time-consuming and requires optimization in the future
- The exchanges that support XSN are not among the most trustworthy
How to Stake StakeNet
The prospect of staking XSN is, as I previously mentioned, very exciting. The network has the potential to scale infinitely and provide cross-communication with other blockchains. The goal of its developers is for StakeNet to become the only coin you ever need to own, by providing trustless conversion to other currencies if need be, while also doing so extremely quick over Lightning Network.
Another option that’s an upcoming feature is staking XSN in the cloud. Put simply, it’s a web wallet which allows you to stake not only XSN but other coins as well. For now, only Stratis and PivX are supported but other currencies will follow within a few months.
The two downsides of using these wallets are that they’re more easily hacked and there’s a certain fee for using this method. Nothing is official yet, but the speculation based on a statement from a team member is a 16% tax on your profits.
In any case, let’s go over the bare necessities you’ll need, to start staking StakeNet.
Minimum Requirements
- You can be running Windows, Linux or Mac
- Install the StakeNet wallet
- 600MB of hard drive spac
- 1GB of RAM
- 24/7 internet connection unless you’re going to use TPoS
It’s important to note that XSN is a staking only coin and thus cannot be mined. Issuance of new units of currency (also called minting) and production and validation of blocks, is dependent on stakers. As such, it’s only available via exchanges, be that fiat money to crypto or crypto to crypto. My recommendation, as I assume you may just be starting out in the world of digital currencies, is to visit either Cryptopia or Livecoin to obtain XSN.
Once you’ve chosen the source for your coins, you’ll need a wallet to hold them and stake with. You are presented with two options – one with a Graphical User Interface (GUI) or alternatively, with a Command Line Interface (CLI). The latter is best suited for advanced users or those running a raspberry pi for example. I recommend sticking to the GUI version if you’re a beginner. In the upcoming paragraphs, I’ll go over the setup process in detail, so let’s get started.
XSN Core Wallet Setup (GUI)
Step 1: Download & Install the Official Wallet
We first need to download the official StakeNet wallet from GitHub and pick the version for your OS. Install the program and launch it. On the first startup, you’ll be asked to pick a destination folder, that’s where you’ll store the blockchain.
Step 2: Encrypt the GUI Wallet
Encrypting your wallet is a crucial step towards a piece of mind when handling cryptocurrencies. It will enable a higher level of security, making sure you don’t lose access to your coins, even if your system is compromised.
The process begins with opening the “Settings” tab in the XSN Core Wallet. Next, click on “Encrypt wallet” and enter a password. Make sure you remember it or store it somewhere safe, as if you can’t re-enter it for some reason, you’ll lose all access to your coins.
After you’re done, the wallet will shut down and you’ll have to relaunch it.
Step 3: Back up the GUI Wallet
Another safety precaution is backing up your wallet. In the case where your device breaks down suddenly, you’ll be on the safe side and restore access to your earnings easily.
The process is straightforward. All you need to do is go to the “File” menu and click on Backup. You’ll be prompted to create a name for the file and decide where to store it. I recommend multiple locations, just to be safe.
Step 4: Transfer Coins to the Wallet
Next up, supplying your wallet with some coins. To do so, we first need to create an address to send them to. Click on “Receive XSN”, specify a label for your convenience (staking node for example) and click on “Request payment”.
Once you click on “Request payment”, another window will pop up. Click on “Copy address” and open up the exchange’s website where you purchased your coins. Use the link you just copied to send over your coins. I recommend sending only 1 XSN for testing purposes, to make sure everything’s in order. Once you’ve received confirmation that the coin is in your wallet, send over the rest.
Step 5: Unlock the GUI Wallet
The final step to enable staking is unlocking your wallet. That can be done by clicking on “Settings” and then “Unlock Wallet”. Enter your password and you’re done! Do not forget that your coins need to mature for 1440 confirmations to be eligible for staking. Checking your status can be done by going to “Tools” and “Debug console”. Once it’s loaded type in the following line:
getstakingstatus
You’ll get information on whether or not your node is configured properly.
Step 6: TPoS Staking (Optional)
The way TPoS works is by creating a smart contract between you and the merchant. The coins are still in your possession and you can cancel the smart contract at any time. The rules stay the same. After you have drafted the terms and the merchant accepts them, the smart contract starts counting down the necessary 1440 confirmations. Before we continue I need to mention that the moment you create the smart contract you can’t cancel the process. You’ll need to wait for the transaction to be confirmed before doing so. Now, let’s cover the necessary steps.
First, we need to find a merchant who is willing to participate in our smart contract. The quickest way and the one I recommend is to visit the official discord channel. On the right side you will see “TPOS MERCHANT”. You can directly message them and agree on a commission. In case you aren’t sure which ones are merchants you can always ask in the general chat for help. The community is awesome!
Once you guys agree on the commission, the merchant will give you a code. Copy that code and go back to your XSN wallet. Click on TPoS and paste in the string. Below that field, you will need to input the amount you want to stake. Keep in mind that to keep staking, you need to have at least 1 XSN in your wallet. For example, if you have 1,000 coins you’ll need to input 999 in the “amount” section. If you have 5,000 coins, you’ll need to input 4,999.
Afterwards, change the commission % that you agreed upon and click Stake. It should look something like this:
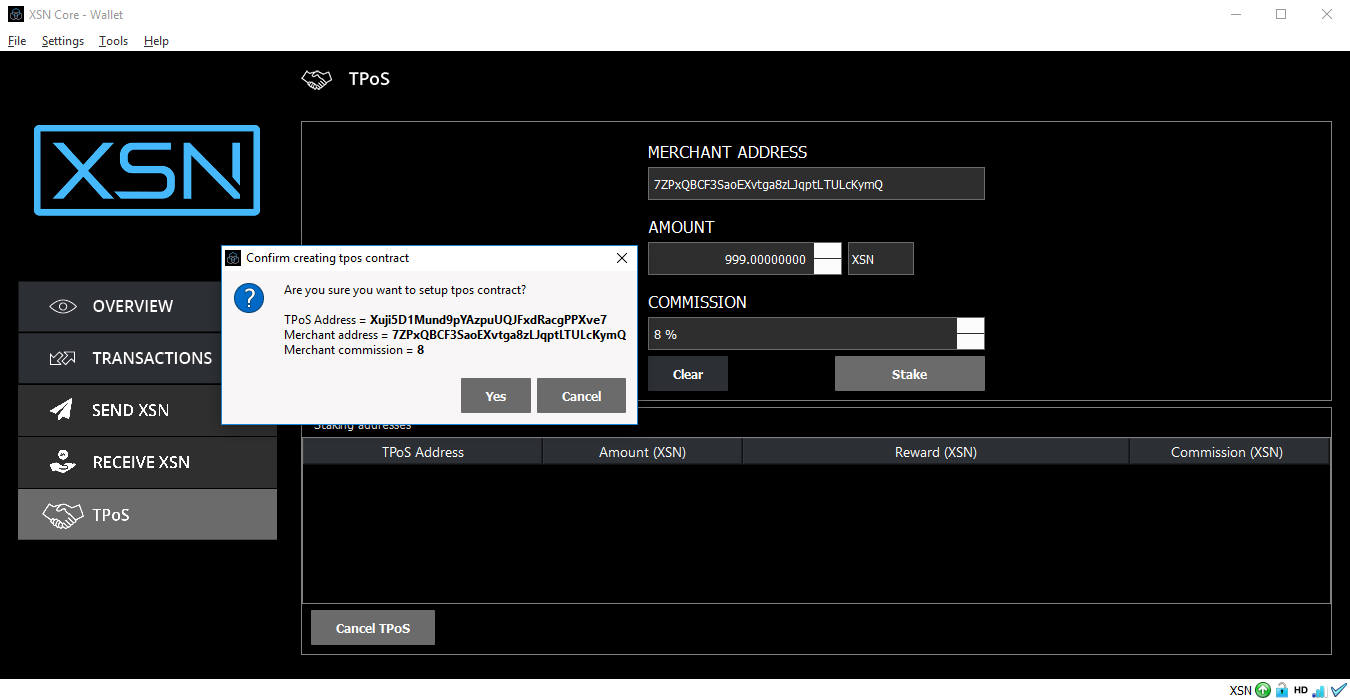
That’s all it takes. The whole process is about 20 seconds long if you already have the necessary information.
Staking with the Command Line Wallet (CLI)
If you’ve decided to take the complicated route, welcome! Using the CLI wallet for staking StakeNet will allow you more freedom for using a less resource hungry machine. I suppose most of you that chose this method, will be running a version of Linux, so the examples are given based on me running Ubuntu.
Step 1: Download & Installing
The first step would be to download the wallet. Open up a terminal and type in the following lines:
sudo apt-get install curl
curl –s https://api.github.com/repos/X9Developers/XSN/releases/latest | grep browser_download_url | cut –d ‘”’ -f 4
The result will supply you with links to the latest version of the wallet. Copy the one for the .tar.gz extension in this case, as we’re running Ubuntu and enter the line below:
wget <paste in the link you just copied, ending in .tar.gz>
Example:
wget https://github.com/X9Developers/XSN/releases/download/v.1.0.16/xsn-1.0.16-x86_64-linux-gnu.tar.gz
Once you’re done, we need to unpack the file. You can do that by typing:
tar -xzvf xsn-1.0.16-x86_64-linux-gnu.tar.gz
If at the time of reading the article, the version is newer, simply swap the numbers. Next, remove the source file as it’s no longer needed:
rm -rf xsn-1.0.16-x86_64-linux-gnu.tar.gz
Next up, launching the wallet. Enter the following lines:
cd xsn-1.0.16/
cd bin
./xsnd -daemon
As I previously mentioned, by the time you’re reading this article, the version may have changed. To double check and make your life easier, you can press “Tab” after entering the folder name and the system will fill in the rest:
cd xsn[Tab]
cd bin
./xsnd -daemon
Step 2: Encrypt the CLI wallet
Next stop – encryption. I highly suggest you do encrypt your wallet, as it will reassure your access, even in the case of your device getting hacked. Using the terminal, type in the following, while also replacing “
./xsn-cli encryptwallet <your password>
Make sure you don’t forget your password and record it somewhere safe.
After entering your password, the wallet will shut down and you have to relaunch it by typing in:
Step 3: Backup the CLI Wallet
Having encrypted your wallet, now it’s time to back it up – another important step which shouldn’t be skipped. Use the command provided below:
./xsn-cli backupwallet <Your selected folder / external driver / USB]>
Example:
./xsn-cli backupwallet ~/xsn-1.0.16/bin/
Step 4: Transfer Coins to the Wallet
Now that we’ve created your wallet it’s time to supply it with coins. To do so, we need to generate an address. That can be done with the help of this command:
./xsn-cli getnewaddress
After you’ve received the string, copy it and send over 1 XSN coin from the exchange you purchased your coins from. Once you’ve confirmed receival and everything’s in order, transfer the rest. You’ll need to wait for 1440 confirmations afterward, your coins to mature and be eligible for staking.
Step 5: Unlock the CLI Wallet
To enable staking, we first need to unlock the wallet. This is done using the following line of code:
./xsn-cli walletpassphrase <passphrase> 0
<passphrase> – the passphrase you used to encrypt your wallet.
0 – the number of seconds which your wallet will stay unlocked. 0 means unlimited.
./xsn-cli getstakingstatus
If you’ve missed a step or something isn’t configured properly you’ll see “false” next to the line of text. If everything is in order, congratulations, you’re officially staking!
StakeNet Staking Reward
Now that we’ve covered the staking setup process, it’s time to explore your potential earnings. In this section, we’ll explore how the reward system works, while later I’ll provide you with a convenient calculator.
To calculate your chance of being chosen to create a block, the first factor is the number of coins you hold. Next stop – figuring out how many coins are actually being staked. To do so, we need to multiply the coins needed for establishing a masternode (15,000 XSN) by the number of current masternodes. Once we have that number, we’ll subtract it from the total amount of coins in circulation. From that, we’ll remove 10% of the supply, that goes into the treasury. Afterward, the amount is multiplied by the percentage of those being staked in the network. Once we have that number, your coins are divided by the total of the ones being staked and multiplied by 1440 or the number of blocks created in a day. Roughly, that equals to 3% chance of you winning a block. Having in mind that stakers receive 45% of the block reward, that would equal to 9 coins out of 20, currently.
You can find a visual representation of the formula below.
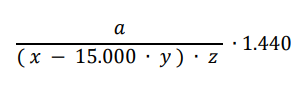
A – the total amount of coins you currently own. In this case – 1000.
X – the total supply of coins in the network – 74,000,000 at the moment.
Y – the number of all masternodes in the network – currently sitting at 1500.
15,000 XSN – the investment needed to create a masternode.
C – 45% or 0.45 as 10% of the coins go to the treasury and 45% go to masternodes
1440 – the blocks created in one day.
(A / ( ( X – 15,000 * Y ) * C ) ) )* 1440
How to Maximize Rewards
Increasing the actual size of the reward is not doable by the user, lest the network decides as a consensus to increase block rewards. You can, however, increase your chances of winning by optimizing your staking via Coin Control. Let’s explore this aspect of the process in detail.
-
Coin Control
- Every time you receive a reward, your coins get split into two equal pieces. Let’s take as an example 1000 XSN coins. When you create a block, you’ll receive two blocks (UTXO) with 504.5 each. Your wallet can combine all small sums into one or multiple addresses, depending on your wishes. As it sums up amounts to a higher overall value, it thus increases your chances of being “chosen” by the staking lottery, compared to leaving rewards in smaller chunks.
To enable coin control, first make sure you’re staking. In the GUI wallet you can check your status by going to “Tools”, clicking on “Debug window” and typing:
getstakingstatus
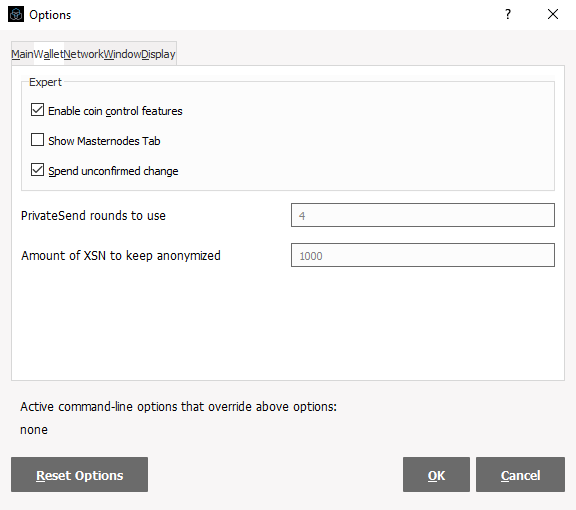
Make sure all the results show “true” and continue. Enabling coin control is straightforward. Go to “Settings”, click on “Options” and select the “Wallet” tab. You’ll see “Enable coin control features”. Tick it to enable and press OK.
Dust Control
Next up – gathering all the blocks together as that’s the reason for enabling coin control. Fret not, we’ll provide visual aids for your convenience.
Go to your wallet and click on “Receive XSN” to create a new address. Fill out the “Label” field and click “Request Payment”. Select the address and click on “Copy address”.

When you’re done, it’s time to send your small block payments to this address. You’ve already copied the address, now open up the “Send XSN” section and paste the information. If everything’s correct, the wallet should automatically fill in the “Label”. If not – make sure you compare every letter as there’s a chance you’ve made a mistake.
Now, you should be able to see the “Inputs” button in the top part of the screen. Click on it and a new window will open up where you can see all your block rewards. If it’s empty, don’t worry, it just means you haven’t received any. Click on “Select all” or simply pick out the small values.
On the right side of the wallet, you will see the total number of coins you are going to send. Copy the number and paste it in the “Amount:”. Before you click send read about “Splitting Outputs”.
Split Addresses
This is a trick almost no one talks about. When combining all the rewards you usually send them to one address. This is not a bad strategy but it’s not the most profitable one. Every time you hit a block your coin’s age gets reset to 0 and you must wait for the coins to mature. For StakeNet, you’ll need to wait for 1440 confirmations to begin staking again.
After you’ve selected all the small rewards that you received, you will see a button “Split UTXO”. If you want to use this option enable it and on the right side enter the amount of staking blocks you want to have. After you’re done with that you can click on “Send”.
And you are done. You’ve just sent all your small block rewards to the new address/addresses. This increases the overall passive income.
It’s a good idea to do this every few weeks, to increase the chances of getting a reward.
Figure out Your Profit with the StakeNet Staking Calculator
For the sake of an example, I’ll assume you own 1000 coins. This would mean you will potentially receive 16.77 coins for a month or 201 coins yearly, or a 20% ROI per year. In any case, you’ll have to deduct your electricity costs from any rewards you might receive. To get an estimate for a specific amount you’re willing to invest in, use the provided calculator below.
FAQ
No, as it’s a Proof of Stake coin only.
Yes, but there’s no dedicated wallet. You’ll have to use the command line wallet instead, which I’ve provided a detailed guide to in the article.
The coin maturity period is 1440 blocks and then you’ll be eligible for staking. It’s reset each time you win a reward.
I would say yes, as the project is unique and isn’t copying from any other coin, unlike a major part of the competition.
No, as there’s no max supply put in place.
The main idea behind staking is earning without investing in expensive hardware compared to traditional Proof of Work cryptos. Furthermore, there’s the availability of masternodes and a relatively high ROI of around 20 percent. You can also stake multiple coins (Stratis and PivX) with StakeNet’s web wallet.
You have either not waited long enough for your coins to mature, or you haven’t configured your wallet properly.
About StakeNet
StakeNet creators’ aim was to build а highly secure inter-chain ecosystem. XSN uses the core of Bitcoin, an improved version of Dash’s masternode architecture and adjusted coinage as we have seen in Peercoin for validating new blocks. The network’s official launch was on the 6th of March 2018.
Unique Selling Points
The network uses a trustless Proof of Stake (TPoS) consensus allowing users to continue staking even when their wallets are offline. On top of that, the developers have created the possibility for users to install the wallet and start staking immediately without the need of a fully downloaded blockchain, called Cloud Staking. You can also set up a second machine (VPS preferably) that can do all the work for you without risking your coins. Finally, probably the most unique feature – Cross-Chain POS Mechanism. XSN allows you to interact with other blockchains and transfer value between them.
Team
The coin’s founders are Draper (also known as Esteban), Shahab Behzadi and Nathan Faust. Combined with the vast network of developers participating in the project, some of which include Benjamin Wang, Yura Oleksyshyn and Eloy Gil Guerrero, they’ve created an innovative product that has further expanded upon the capabilities of market leaders.
Network
To secure the network and validate transactions we have Staking nodes that anyone can run and also Merchant nodes that enable the use of Trustless Proof of Stake (TPoS). For higher level functions, such as the XSN exchange, increased privacy levels and the masking of transactions, there are masternodes setup, each of which is an investment of 15,000 XSN coins.
Privacy
Stakenet’s PoS blockchain utilizes enhanced security algorithms, while also supporting Lightning Network and Cross Chain transfers and validation. XSN also provides exceptional security levels with its own internal TOR network, that opposed to the one present in XVG, allows for truly obfuscated transactions.
Future
According to the official roadmap, we can expect to see the first dApps launching on XSN’s test net by the end of 2018 and cold staking being enabled for Ledger Nano S. All in all, StakeNet has a bright future ahead of itself and I’ll surely be keeping tabs on their progress. I suggest you do the same.
Useful Weblinks
- Website: https://stakenet.io
- Announcement Page: https://bitcointalk.org/index.php?topic=3213013.0
- GitHub: https://github.com/X9Developers/XSN
- Block Explorer: https://xsnexplorer.io/
- Whitepaper: https://stakenet.io/Whitepaper_Stakenet_V3.0_EN.pdf
- Socials:
- Twitter Reddit/Subreddit