QTUM Staking – Everything You Need to Know
QTUM staking is the process in which, by investing in said coins, you are able to increase the value of the network, build trust and secure it. In turn, you have the chance to receive a return on your investment.
The goal for QTUM and the foundation which bears the same name was to design a cryptocurrency which would simplify the usage of smart contracts across institutions and businesses. This coin also has a unique adaptation of Proof of Stake. The network is based on an Ethereum Virtual Machine (EVM) that runs on Bitcoin’s blockchain. Some would say, this is combining the best of both worlds while also offering businesses more incentive to implement blockchain technology.
In this article, I’ll go over the specifics of how to stake QTUM and configuring your wallet. As the network is pure Proof of Stake, there are no mining blocks and no masternodes. Staking nodes serve as communication relays, create new blocks and receive rewards.
Pros & Cons
- Upgraded Bitcoin Core base code with Decentralized Governance Protocol (DGP)
- Usage of an Ethereum Virtual Machine that enables running of Smart Contracts
- Staking QTUM is less risky compared to other currencies – no minimum number of coins required to participate
- Controversy surrounding the founder of QTUM – Patrick Dai. It’s been proven he was previously involved in the BitBay scandal under the name “Steven Dai”
- Lack of vision for QTUM’s gas tokens future besides being the fuel for smart contracts in the network
How to Stake QTUM
The way QTUM’s Proof of Stake mechanism works is similar to a random lottery. Depending on the number of coins you stake, relative to the total number of coins in the network, your chances of winning vary. Something to note about the network is that each QTUM core wallet acts as a full node. As such, there’s a high level of decentralization and security.
Further expanding on the matter, how to stake QTUM might be of interest to you, as the platform provides the functionalities of Ethereum, however, it’s ahead in its development and has already moved from PoW to PoS. The more people that start using the network, the higher the value of it would be.
To get you started, I’ve prepared a list of minimum requirements you would be expected to meet and furthermore, how to configure your wallet to start staking.
Minimum Requirements
- Windows 32/64-bit, MacOS or Linux
- Installed QTUM Core wallet
- Own at least 1 coin to stake
- Minimum space requirement – 4GB and rising
- 512MB of RAM
- Static IP
Considering QTUM is a PoS coin only, there’s no way to mine it. Obtaining it, however, is possible via fiat exchanges or if you’re already into crypto, there are crypto to crypto pairs available. I believe that you’d be best off using BitFinex or Kraken to buy QTUM.
To obtain the number of coins you desire, you’ll need a wallet to hold and control them. I recommend going for the official QTUM core wallet. Once you’ve installed it on your PC you’ll be able to use your wallet address to receive funds. More on that later in the guide.
For beginners, I’ve already provided the link for the GUI or Graphical User Interface version of the QTUM Core Wallet. If you’re experienced, simply curious or trying to run your staking on minimal hardware, I’d recommend using the Command Line Interface (CLI) version.
QTUM Core Wallet Setup (GUI)
Step 1: Download & Install the Official Wallet
As previously mentioned, I recommend using QTUM Core Wallet, which can be downloaded from the official website. Once you have it installed, run Qtum-QT from your desktop.
Step 2: Encrypt the GUI Wallet
To keep your funds safe, I’d recommend using the baked in function of encrypting your wallet. This way, you’ll ensure that even in the event of having your computer hacked, i.e. your wallet.dat file cloned or control over your PC hijacked, attackers won’t be able to manipulate your funds.
To start staking, first, click on Settings -> Encrypt wallet and afterward, enter a password. Following that procedure, your wallet will shut down and you’ll have to relaunch it.
Step 3: Back up the GUI Wallet
The next step would be to perform a backup of your wallet. Once you select the option, you’ll have the option to define a filename and save it in a specific directory. I recommend having at least one local, one portable drive copy and perhaps a cloud backup. This way, you can make sure that in the event where your PC breaks down or your hard drive breaks, you’ll still have a way to restore access to your coins.
Step 4: Transfer Coins to the Wallet
As I previously mentioned, to receive and afterward stake your coins, you need a wallet address. Click “Receive”, enter a name in the “Label” field (ex. mywallet) and click “Request payment”.
Step 5: Unlock the QTUM Core Wallet
Once you’re done with the above-mentioned steps it’s time to unlock your wallet. Click on Settings -> Unlock Wallet and enter your password (make sure “for staking only” is selected).
Now, you’re ready to send coins to your wallet. To start staking, you’ll need a minimum of 1 QTUM and you must wait for 500 confirmations to pass – roughly 17 hours. Once those conditions are met, you’ll be on your way to making a profit.
Staking with the Command Line Wallet
Provided you’re interested in running a wallet on an old machine with limited resources or a raspberry pi, for example, then the CLI wallet is the tool for you. As I assume most people that choose this option will be Linux enthusiasts, this guide will cover the steps by using Ubuntu as an example.
Step 1: Download & Installing
To download the wallet, type the following into the terminal:
sudo apt-get install curl –y
curl –s https://api.github.com/repos/qtumproject/qtum/releases/latest | grep browser_download_url | cut –d ‘”’ -f 4
By using these commands, you’ll get the latest version of the official wallet. Considering we’re on Linux, we’ll be using the file extension “.tar.gz”. Copy the link from the result and use it in the next command:
wget <Paste the link which ends on tar.gz>
Example:
wget https://github.com/qtumproject/qtum/releases/download/mainnet-ignitton-v0.16.1/qtum-0-16.1-x86_64-linux-gnu.tar.gz
Next step would be to unpack and afterward remove the unnecessary origin file.
tar -xzvf qtum-0.16.1-x86_64-linux-gnu.tar.gz
This will unpack the files, change the numbers if you have a newer version. Next, remove the base file, which carries the .tar.gz extension:
rm -rf qtum-0.16.1-x86_64-linux-gnu.tar.gz
After all, that’s done, it’s time to launch the wallet. Type in the following:
cd qtum-0.16.1/bin
./qtumd -daemon
At the time of writing, this article is the most up-to-date version is 0.16.1. Yours could be different depending on when you read the article. To be sure which version/folder you have you can double tap and the OS will fill in the rest:
cd qtum[double tap]
cd bin
./qtumd -daemon
Step 2: Encrypt the Wallet
The next step would be to encrypt your wallet. Replace
./qtum-cli encryptwallet <your password>
Make sure you’ve saved your password somewhere safe, as if you forget it, you’ll lose all access to your funds.
The wallet will stop. You’ll need to launch it again with the following command:
./qtumd –daemon
Step 3: Backup the CLI Wallet
This is as I mentioned before, a crucial step that shouldn’t be skipped. To perform a backup, type in:
./qtum-cli backupwallet <Your selected folder / external driver / USB]>
Example:
./qtum-cli backupwallet ~/qtum-0.16.1/bin
Step 4: Transfer Coins to the Wallet
To receive/transfer coins and start staking, we’ll need a wallet address. Let’s create one by typing in the following:
./qtum-cli getnewaddress
Once you have your address, visit the exchange where you have your coins and send exactly 1 QTUM to the address. After you confirm that the coins are on their way you can send the rest of your coins.
Don’t forget that you need 500 confirmations to be able to stake.
Step 5: Unlock the CLI wallet
Before we can start staking we need to unlock the wallet. Type in:
./qtum-cli walletpassphrase <passphrase> 0 true
<passphrase> – the passphrase you used to encrypt your wallet;
0 – the number of seconds which your wallet will stay unlocked. 0 means unlimited;
true – unlocked only for staking; That’s it, you should be good to go. To check your current status type in:
qtum-cli getstakinginfo
This command will show you which necessary steps are done, and which are not. If you see “false” that means that that step is not configured or incomplete.
QTUM Staking Reward
The profitability of any PoS coin depends highly on the amounts you’re holding. In the case of QTUM, the current reward is at 4 QTUM and you’re unable to receive it any other way besides staking. There are no masternodes in this network.
Your chances of being chosen to validate transactions and receive a reward in return, depend on the number of coins you own in comparison to the total amount in circulation at the moment.
For example – if you have 10,000 QTUM coins (your weight) and there are 75,000,000 QTUM (total weight) in the network, your ROI will be 1.36% per year. Owning that amount of currency means that you’ll receive a reward roughly every 7.4 days unless you’re really unlucky, in which case the maximum period between earnings will be 25 days.
In any case, I would suggest you don’t quit your day job and rely solely on the rewards from staking QTUM.
How to Maximize Rewards
Aiming to improve your chances of receiving or in general, increasing the number of rewards is something every user would strive for. Unfortunately, you cannot affect the latter aspect in any way. What I can help you with, however, is to optimize your chances of succeeding. Let’s dive into further detail.
-
Pool Staking
- I’ll be honest with you, it serves no purpose, nor is it profitable. Once you join a pool, you’re required to share information with others, which exposes you to risks. That, in turn, contradicts the basic principles of QTUM which are privacy and anonymity. Another fact to keep in mind is that, to start staking you only need one QTUM coin, so there’s no need to join a pool.
-
Coin Control
- When receiving rewards, in most cases, it gets split into two equal parts. If you have staked 1000 QTUM for example and you have the 4 QTUM block reward, you’ll receive 2 UTXO transfers of 502.0. No matter, your wallet sums everything up and provides you with a total. The idea behind coin control, however, is to allow you to merge all the small rewards into one or several addresses. This way, you’ll have your funds grouped into manageable portions instead of having them spread out in various blocks. As the sums are larger, you have an increased chance of being selected to validate a block, hence the increased probability of receiving a reward.
Get Staking Status
Before continuing with the next step, you need to make sure that you’re already staking. To do so, go to your wallet and click on Help > Debug window and inside the console type:
getstakinginfo
You’ll see different functions. Make sure all of them are “true” before continuing with the coin control. If not, go back to the beginning and compare the steps you did during the setup process.
How to Enable Coin Control
Open up the Settings menu, click on Options and select the “Wallet” tab. You’ll see the “Enable coin control features” line, just tick the box and click “OK”.
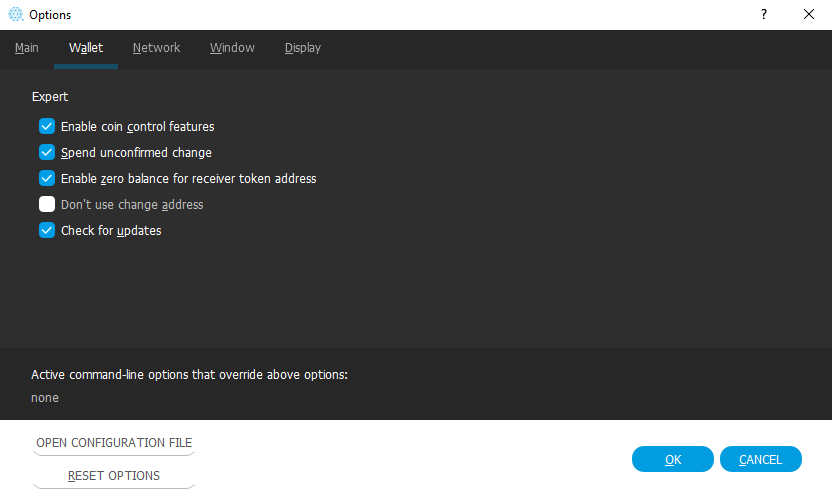
Dust Control
Now it’s time to move on to enabling Dust Control, as, after all, that’s our main reason to turn on Coin Control.
Open up your wallet, click on the “Receive” tab and create a new address. To do so, you need to fill in the “Label” field and click on “Request Payment” on the top right of the window.
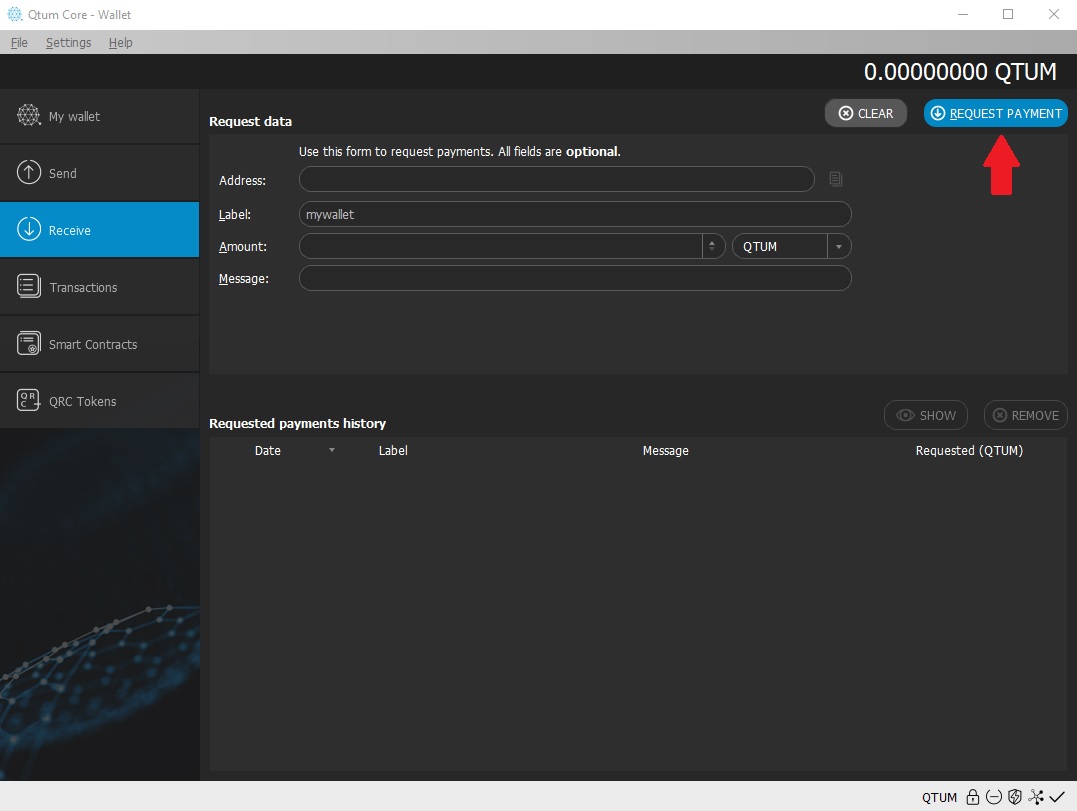
In the example, I’ve created a “Staking Node” address. Once you’re done, select the address you just created and click on “Copy” in the window that just popped up.
Let’s go ahead and transfer payments. Click on the “Send” tab and paste the address in the “Pay to:” section. If everything is correct, the wallet should recognize that it’s the address you created and fill in the “Label” field automatically. In case that doesn’t work, carefully compare the addresses and make sure you haven’t made a mistake.
You should be able to see the “Inputs” button in the top part of the screen. After you click on it, a new window will pop up with all the block rewards you’ve received so far. Click on “Select all” or just the ones that are small sums and press OK. If you don’t see anything, don’t worry. That means you recently started staking or you just haven’t received any rewards yet.
In the right of your wallet, you will see the total number of coins you’re going to send. Copy the value and paste it into the “Amount:” field.
And that’s it, you’re done with optimization of your wallet!
Figure out Your Profit with the QTUM Staking Calculator
From the results of the calculator below, you’ll have to deduct your power bill for maintaining the hardware you use for running your wallet. I’d recommend using a raspberry pi if you have one laying around if you’re eager to minimize the electricity costs. Otherwise, I wouldn’t suggest going out of your way and buying one just for the purpose, as you’ll have to first cover the cost and afterward start making any profit.
FAQ
As it uses Proof of Stake as a consensus algorithm, the answer is no. The process of generating new coins, in this case, is called minting or staking.
It’s possible, however, I wouldn’t recommend it as it’s another investment in hardware. If you’re enthusiastic, feel free to do so – you’ll need to use the CLI wallet if you’d like to minimize resource draw.
The initial period of maturing lasts 500 blocks or roughly 17 hours. Afterward, you could expect a reward between 7 to 25 days, depending on your luck, the number of coins you own and the network status.
Depends on your expectations for profitability. You could achieve up to 6% ROI.
The initially issued supply of coins is 100 million – an instamine. Every 4 and half years or 985,500 blocks, a halving of the rewards occurs. To calculate the new max supply, you’d need to multiply that fixed number of blocks by the new value of the reward and add that to the previous total amount.
If you’re interested in supporting the network, believe in the project and want to make some money while you’re at it, staking is the way to go.
Either you have not waited for the maturity period or your wallet is locked. To be sure re-trace your steps based on the article.
About QTUM
QTUM is a hybrid solution that combines Ethereum’s smart contract capabilities on top of Bitcoin’s stable blockchain, all while implementing a Proof of Stake consensus for transaction verification. The goal of the QTUM foundation is for its blockchain to serve as a basis for business from various industries including, but no limited to: Mobile Telecommunications, Counterfeit Protection, Finance, Logistics etc. This coin offers high levels of stability, modularity and an extensive toolkit for developing dApps suited for real-world business applications. QTUM’s hybrid PoS consensus provides support for mobile devices and IoT devices natively, while also being compatible for interoperability with major blockchains.
Unique Selling Points
To be honest, I have not found any truly unique features for the staking of QTUM, but I have chosen it as part of the top 10. This is because the whole project itself is like no other. They’ve taken an innovative approach towards smart contracts and a unique adaptation of the PoS consensus as well as being based on the Ethereum Virtual Machine (EVM). Additionally staking it will bring you a very hefty profit. The more you stake, the more you make.
Team
The team behind this project is based in Asia and owing to their marketing efforts it has earned them the title of “the Chinese Ethereum”. The founder’s name is Patrick Dai and he’s been joined by longtime developer Neil Mahi and systems engineer Miguel Palencia.
The Network
After rigorous testing, the main network was launched on the 13th of September 2017. After the initial period of setting up nodes, the exchange of ERC-20 tokens from the ICO was enabled.
Future
Based on the official QTUM roadmap, we can expect to see the first public testnet for QTUMx in late 2018. It is a derivative of QTUM, using the same technology but providing businesses and institutions with the possibility to create their own private blockchains. Furthermore, this will push the project to start seeking partnerships with large companies during the first half of 2019. From the 2nd quarter on out, we can expect to see a Lightning Network public testnet.
Useful Weblinks
- Official Website: https://qtum.org/en
- Announcement Page: https://bitcointalk.org/index.php?topic=1720632.0
- GitHub: https://github.com/qtumproject/qtum
- Block Explorer: https://qtum.info
- Whitepaper: https://qtum.org/user/pages/01.home/Qtum%20whitepaper_en%20v0.7.pdf
- Socials:
- Twitter Telegram Reddit/Subreddit