Staking Particl (PART) – Everything You Need to Know
Particl staking is simply keeping your coins in a wallet. Once they reach maturity, you can unlock your wallet and start competing to sign the next block, which is going to bring you a reward.
Interested to know what makes Particl (PART) so special? First of all, it offers a custom PPoS (Particl Proof-of-Stake) protocol used as a distributed consensus mechanism. Furthermore, all the users are provided with a cold staking option in tandem with hardware or paper wallets, making possible to stake offline. This amazing feature helps you stake without any risk of hacking or compromising your keys. Want to know what concern you the most? – Anonymity, this is everything Particl’s reincarnating.
In this article I’ll guide you through the different variants of staking Particl (PART) and how to make a profit, as there’s no other option available for this purpose, masternodes are not present in the network.
Pros & Cons
- Combining the top performant’s technology – using the code base of Bitcoin, adding a dose of privacy functionalities and spicing with lots of unique Particl features
- Anonymity – completely untraceable transactions and encrypted messages
- User-friendly interface – keeps all the complicated processes in the background
- Security – Quantum-resistant keys which are cryptographically secure
- Cold hardware staking – a way to protect your coins, when your wallet is open for staking and connected to the network
- Your wallet must be connected to the network 24/7 to stake (note this isn’t applicable for the cold staking mode)
- Each wallet requires some monitoring in order to be sure it’s properly functioning without any fails. The difference here comes with frequent updates, implementing new improvements, which impose some extra-time for upgrades
- No masternodes feature available
How to Stake Particl
Staking Particl can be done in three different ways. All of them involve some tinkering with programs, but I’ll cover that in detail later on. You’re are presented with two different GUI wallets and one CLI option. In the event that you’re unable or unwilling to keep your machine online 24/7 you can also benefit from cold staking via the Particl Desktop version. In general, GUI wallets are more resource intensive, compared to CLI ones. The latter are best suited for advanced users.
You’re free to use your personal PC or establish a Virtual Private Server (VPS) with the sole purpose of staking PART. In any case, you’ll be joining a network that benefits from a quantum-resistant consensus mechanism, many security features and a decreasing inflation rate, thus offering you a coin with investment potential.
In the upcoming section I’ll cover the basic requirements for starting with Particl staking and how to configure the wallet of your choosing.
Minimum Requirements
- Windows/Linux/MacOS X Operating system
- Particl Core wallet set up
- 5 GB of hard disk space
- 1 GB of RAM
- Static IP address
- VPS (Virtual Private Server) if you decide to use cold staking*
- 24/7 online connection for your wallet
* If you decide to use cold staking, you’ll need to setup your personal machine as the cold staking node and run a dedicated VPS 24/7 to which you’ll delegate your staking rights, but keep your coins in your main wallet.
To get started with staking Particl, you’ll first need to obtain some coins. To do so, you can purchase them via a fiat-crypto exchange (for example LiteBit) or if you already own some other cryptocurrency, you can swap it on Bittrex.
Particl-QT Wallet Setup (GUI)
Step 1: Download & Install the Official Wallet
First up – we need to install the official wallet. For this purpose, you can visit Particl’s website and download the Particl Core QT. Simply start the executable and complete the necessary procedures. Once you’re done, launch the program and continue with the next step.
Step 2: Encrypt the Wallet
Now, we need to encrypt the wallet. Go to Settings > Encrypt wallet…
You will see a new pop up appear. You’ll need to type in a passphrase which will be used to lock and unlock your account.
Attention: Don’t forget this passphrase, once forgotten – no one can help you.
After you’ve typed in your passphrase click ok. A warning message will show up for you to save the passphrase somewhere. Finally, when you click the ok button, the wallet will close itself.
Open the wallet again. In the bottom corner, you will see a lock. That means that the wallet is encrypted and in “locked” state right now.
Step 3: Backup your Wallet
Now we need to back up your wallet file. Click on File >Backup wallet… A new window will pop up to prompt you to select a destination folder where you will back up your.dat file (wallet file). If nothing happens when clicking “save” make sure you’ve entered a name of the file.
Step 4: Transfer Coins to the Wallet
Now, let’s create an address which will be used for staking - click on “Receive”. We need to type in a name in the “label” section. You can use whatever name you want. We will use “staking node” as a label for our example. After that click “Request payment” and you’re done. A new window will pop up which will show you an address. Copy that address somewhere since we will need it later.
Since you just created your address that means you most likely have your coins on an exchange. Log in to your exchange or where ever you’ve stored your coins and send the amount you have to that address.
After you’ve received your coins you need to wait for 225 confirmations to pass before you can start staking. This is called a maturity period. Every PoS project has it.
Step 5: Unlock the Particl Wallet
After you’ve done all the steps above and waited for 225 confirmations to pass, you’re ready to unlock your wallet. In the bottom right part of your wallet, you’ll see a lock. Click on the lock and enter your passphrase. Make sure the “Unlock for Staking only” box is checked.
After you’ve unlocked your wallet go to Help>Debug Window and click on Console. In the bottom part type in:
Getstakinginfo
You’ll see different values. Focus on “enabled” and “staking”. Both of them should return 1. If one of them returns 0 you will see a line “cause”. That line will tell you why your staking is not enabled yet.
Particl-Desktop Wallet (GUI)
First off, let’s go ahead with the VPS. The minimum requirements for our needs will be 5GB of disk space, 1GB RAM and a Linux OS (Ubuntu for example). If you don’t have a provider yet, you can look up Vultr or Digital Ocean for your Virtual Private Server needs. These two companies are most commonly used in the crypto community. After you’ve set up your server and connected to it using Putty, follow the steps below.
Step 1: Download & Installing
Configuring your VPS
sudo apt-get update -y && sudo apt-get upgrade -y
sudo apt-get install python git unzip pv jq
This will update and install the necessary software needed to run as a staking node.
Let’s move on to the actual staking software. Type in:
git clone https://github.com/dasource/partyman
cd partyman/
./partyman install
It will ask you if you want to install the software as root and if you want to download the client. When asked type in “y” and hit enter. This will download and install the latest particl core daemon. Before we start the daemon, we need to restart it. Yes, I know it sounds weird, but it needs to make several configurations to the wallet which need a restart. So, type in the following:
./partyman restart now
Now let’s create a wallet and back it up:
./partyman stakingnode init
You’ll receive a recovery phrase. Copy it somewhere safe, as it’s the only way of restoring access to your funds in case there’s a hardware or software failure. After you’re done saving it somewhere safe, press “y” and “Enter”. Now let’s create a public key. This key is extremely important since it will be used in the Particl-desktop wallet for cold staking.
Type in:
./partyman stakingnode new
You’ll be asked to input a label for your new key. We will use staking node as an example. After you’ve typed in a label you will receive a cold staking public key. As we mentioned above this key is extremely important so make sure to save it somewhere. And that’s it for the VPS. Now go back to your local machine.
Configuring your Local machine
Go to the official website and download the Particl Desktop wallet for your Operating System. After you’ve saved and unzipped the files, find the “particl-desktop” file in that folder. Double click to open the wallet.
Since you’ve just installed the software the wallet will not recognize a wallet.dat in your system
Step 2: Encrypting Your Particl-Desktop Wallet
Next up is encrypting your wallet. You’ll need to enter a passphrase. Do not forget the passphrase. If you forget or lose the passphrase, you’ll never be able to send the coins that you own.
After you’re done with the encryption the wallet will restart.
Once you’re done with the encryption, it’s time to create a SEED. Click on “Create new wallet” (this will create a recovery passphrase). You’ll be asked to input a name for your wallet. Type in anything you want and click Continue.
After that, you’ll have to type in a Recovery phrase password. This is optional but highly recommended as it will increase the security of the generated SEED. And now you’ll see your Recovery phrase (which consists of 24 words in total). Click “Copy to Clipboard” and paste it somewhere safe.
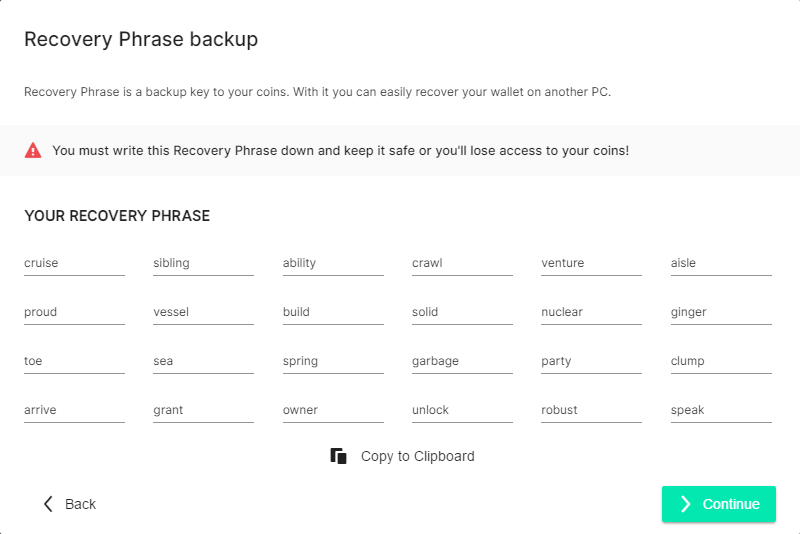
After you hit continue you’ll be asked to fill in the missing words from the recovery phrase. This ensures that the user saved their recovery phrase. After that, you’ll be asked to enter your password to unlock your wallet. The same password you used when encrypting the wallet.
Step 3: Transfer Coins to Your Wallet
Now, time for you to fund your wallet. Go to “Receive” and click on “Copy Address”. After that visit the exchange where you purchased your PART coins and send exactly 1 PART to this address. After you’ve confirmed that the coin is broadcasted to the network and is waiting for the confirmations you can send the rest of your coins.
Step 4: Setup Your Wallet for Cold Staking
After you receive your coins click on Cold Staking Node at the right corner of your wallet. It should look like this:
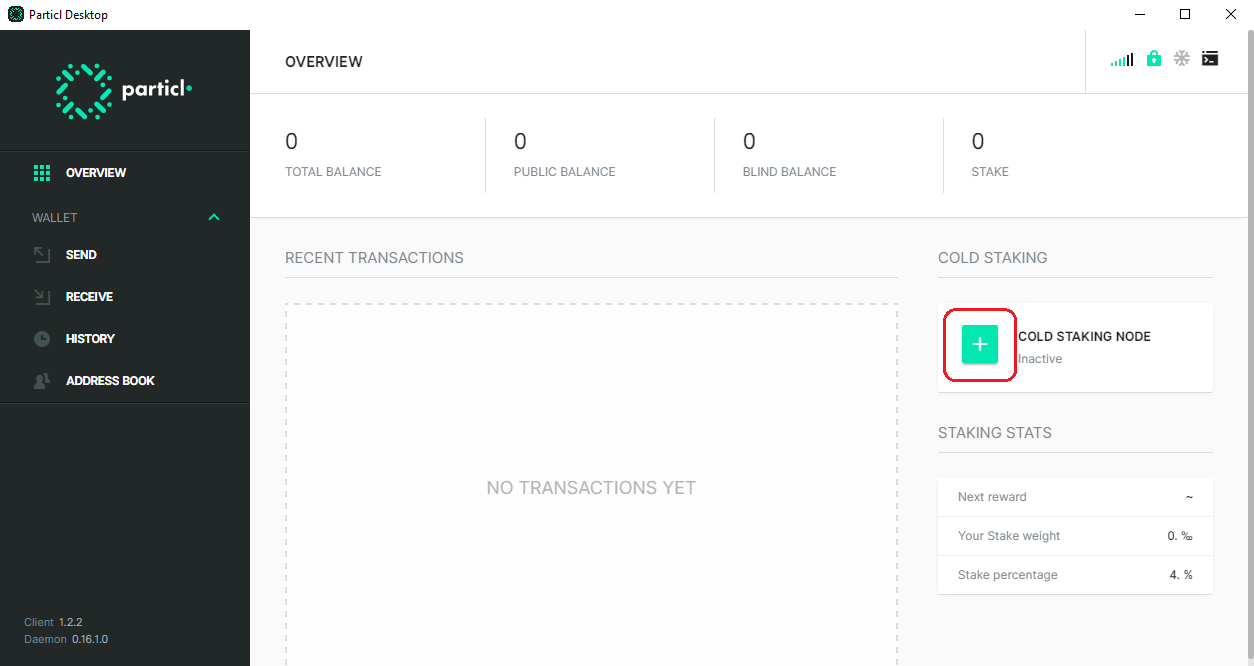
You’ll be asked to type in the public key. The exact key you saved from your VPS.
After that, all you need to do is wait for the staking process to finish. In the right corner, you’ll see 0%. Do not close your wallet before it reaches 100%. After it’s at 100% then you can safely close it and know that your VPS is the one actually doing all the work.
Staking with the Command Line Wallet
Step 1: Download & Installing
First, we need to get the wallet installed on our machine. In the terminal type in:
sudo apt-get install git
sudo apt-get install curl –y
curl –s https://api.github.com/repos/particl/particl-core/releases/latest | grep browser_download_url | cut –d ‘”’ -f 4
Using the above lines, you’ll be able to obtain the link for the latest version of the official wallet. As we’re on Linux, we’ll need the file with a .tar.gz extension. Copy the link for the next command.
wget <Paste the link which ends on tar.gz>
Example:
wget https://github.com/particl/particl-core/releases/download/v0.17.0.2/particl-0.17.0.2-x86_64-linux-gnu.tar.gz
After you’ve downloaded the file we need to unpack it:
tar -xzvf particl-0.17.0.2-x86_64-linux-gnu.tar.gz
Once you’ve unpacked the file, you need to remove the original. You can do so with:
rm -rf particl-0.17.0.2-x86_64-linux-gnu.tar.gz
If you’re on a newer version, you’ll have to adjust the numbers in the command.
Next up, time to launch the wallet:
cd pivx[double tap]
cd bin
./particld -daemon
Step 2: Encrypt the CLI Wallet
The next step is to encrypt your wallet. This is done to guarantee that only you will have access to your funds, even if your PC is compromised. To do so, you’re first required to create a mnemonic SEED, before you can proceed. At the same time, you’ll be creating a password of your choosing. It’s as easy as typing in:
./particl-cli mnemonic new <your password>
Type in a passphrase that you deem sufficient and write it down somewhere safe along with your SEED. Make sure you never forget or lose them, as it’s the only way to access your funds. Never share them with anyone. To keep your passphrase and also your SEED safe, create a text file where you can paste the information. Make sure to have multiple copies just in case and safeguarding those files with a password isn’t a bad idea as well.
Now that we’ve encrypted our wallet, we need to unlock it temporarily using the passphrase we just created. Type in:
./particl-cli walletpassphrase <your passphrase> 600
You’ll have your wallet unlocked for 600 seconds or 10 minutes. Next up:
./particl-cli extkeygenesisimport
The client will now ask you for the SEED you created. Copy and paste it from before and hit “Enter”. Importing the SEED will take about 15 to 20 seconds. After you’re done, copy the result into the same file where you stored your SEED and passphrase.
Step 3: Backup the CLI Wallet
This step is extremely important and should not be skipped. To back up your wallet type in:
./particl-cli backupwallet <Your selected folder / external driver / USB]>
Example:
./particl-cli backupwallet ~/particl-0.17.0.2/bin/
Step 4: Unlock the CLI Wallet
Before we can start staking we need to unlock the wallet. Type in:
./particl-cli walletpassphrase <passphrase> 0 true
<passphrase> – the passphrase you used to encrypt your wallet.
0 – the number of seconds which your wallet will stay unlocked. 0 means unlimited.
true – unlocked only for staking.
And that’s it. You should be ready for staking.
Now let’s check the status of your staking. Type in:
./particl-cli getstakinginfo
This command will show you which necessary steps are done, and which are not. If you see “false” that means that that step is not configured or incomplete.
Particl Staking Reward
Ultimately, we should discuss staking profitability. What is interesting here, is the fact that Particl is designed to support a higher price during the adoption process, which makes it attractive to stake.
Provided all available coins in the network are being staked, you can expect a yearly ROI of 5%. However, this is not the case, as it’s more realistic to assume that only 50% of the supply is staked. In turn, your ROI jumps up to 10%, provide your wallet is online 24/7. To compensate the initial wave of increased profit from early adopters, the developers have put in a yearly inflation rate that started at 5% for the first year, 4% for then second and will drop to and remain 2% from the forth year on. On average, you can expect to be chosen for validation every 12.6 days.
Masternodes aren’t in the purview of the Particl staking, actually, there aren’t any of it. How does this concern you? In fact, it’s a pretty good news, because it means that the block reward splits at 90% for the stakers and 10% for the development team. All the fees are redirected to the stakers – currency transactions, listing fees, messaging, privacy balance, etc. The blockchain’s traffic increase, so this helps stakers be more motivated to maintain it. Тhe latest update of the Particl website states that rewards are paid in increments of approximately 1.52 PARTs – you can easily calculate the amount of the reward you can expect using the provided calculator further in the article.
How to Maximize Rewards
Normally, your wallet splits your coins into two separate blocks of equal value. To increase your chances of being chosen to validate a block and receive a reward, we have a function called Coin Control. What it does is combine your earnings in a set size of sums, which allows you to be eligible for receiving a reward much more frequently compared to having all your coins in one block. In practice, there’s no real way to directly increase the value of reward aside from voting in the network for a change.
In the case of PART, coin control is limited to the Particl-QT wallet. As in the future it’s planned to be removed, we aren’t going to cover in detail. The reasoning behind this decision is that the developers are not happy with the fact that they cannot offer it in both versions of their wallets.
Figure out Your Profit with the Particl Staking Calculator
Having familiarized ourselves with the mechanics behind making a profit with Particl, now it’s time to make use of the calculator below. Depending on the amount you’re willing to invest, you can get an estimate of your potential monthly and yearly earnings. Having a rough idea of your income from staking PART, you’ll need to deduct your electricity expenses to calculate your net profit.
FAQ
As this is a Proof-of-Stake based coin, the answer to this question is no, you can’t mine it. Only the Proof-of-Work protocol orientated coins are able to be mined.
Yes, you can. Follow the link to observe the step-by-step guide on how to do it.
You have to wait for the maturity stage, which means around 8h before you’ll be able to stake it.
Currently, it’s a great opportunity as you’ll have less competitors and higher chances of winning rewards. Further down the road, with the lowering inflation, your coins will also be worth more in general.
The total supply of coins is 1 billion.
There are a lot of planned features in the Particl’s roadmap. The project is known as promising and even in early development, we conclude it’s a good staking choice.
You might experience several issues here. First, make sure your wallet is unlocked and your coins are mature and public (you can’t stake anonymous and blind coins). Then think of a bigger amount of coins – it’s like having a lot of lottery tickets – the more coins you have, the higher your chance is.
About Particl
Particl (PART) is a Proof-of-Stake open-sourced and decentralized privacy project. Launched in July 2017, the coin features smart contracts, and enormous level security, combined with extremely remarkable anonymity.
Unique Selling Points
What the network brings to the table is their unique Particl Proof of Stake (PPos) consensus, which aims at making staking more fair and decentralized. Another feature is Cold Staking, giving you the option to set up a second machine (preferably VPS) to do all the work for you without risking all of your collateral. I should also mention that the Particl Network has remarkable security as the team have found a way through the PPoS consensus to make the Cold Staking quantum-resistant.
Team
Particl’s team is combining people from all over the world, following the common mission to build a democratic economy on their own platform. It contains managers, designers, researchers, developers, cryptographers, and many advisors.
Network
The Particl network respects the privacy right of each of its users. There are many encrypted features such as a marketplace, messaging and voting system and a self-governed community of stakers. All these serve for the purpose of trading goods and services in a decentralized environment. We observe both current and protocol-agnostic aspect which refers to the ability to use any storage protocol or currency. There’s also a Particl Foundation which supports the project hiring some team members, initiating marketing campaigns, partnerships and others.
Privacy
Transactions are organically untraceable and don’t require any third party to assure its honesty. There are many privacy protocols which take care to protect the user’s personal data from any kind of abuses, commercial purposes, and other surveillance.
Future
If we make a short overview of the Particl’s roadmap, we can discover all the features in progress or the ones which are planned to be implemented. For example, the marketplace is still on beta version. There are multiple projects such as messages improvement or community voting currently on the road. And there are also some planned to accomplish as a hardfork (RingCT), Copay cold staking option and lightning network.
Useful Weblinks
- Website: https://particl.io
- Announcement Page: https://particl.news
- GitHub: https://github.com/particl
- Block Explorer: https://explorer.particl.io
- Whitepaper: https://particl.io/whitepapers
- Socials:
- Twitter Discord Telegram Reddit/Subreddit