Staking PIVX – Everything You Need to Know
Staking PIVX is nothing more than holding coins in your wallet and supporting the network of the coin with them. You might find it curious that there’s not one, but two coins to choose from, which are called PIV and zPIV. The reward you earn from one or the other is different and that’s what makes staking PIVX even more interesting. From our point of view, it is more profitable to stake zPIV, but the final decision is in your hands.
In the following article, you will find all the necessary details to understand which coin is more profitable for you to stake. Do keep in mind, we are just exploring the concept of staking, not how to earn passive income with a masternode. All examples and descriptions are related to staking PIVX.
Pros & Cons
- Passive income with little to no effort
- Innovative, they don’t copy anyone else
- Fast and secure – PIVX is one of the most secure PoS networks out there. Why? The number of Masternodes and staking nodes on the network is impressive. Also, the block time is around 60 seconds, on average, making it fast.
- Great team members – You can’t have a good project without capable team members. Everyone adds their own unique input to the initiative. Some people have several years of experience in the blockchain sphere while others are experienced in software development
- Running your wallet 24/7 adds up in electricity costs
- The reward system is not clear and easy to understand
How To Stake PIVX
PIVX grabbed my attention with its focus on privacy, speed, and anonymity. Furthermore, when it comes to staking, it’s in its own category. You can choose between PIV or zPIV – the name of the anonymous version of PIVX. The Blockchain stays the same, only the requirements and the reward change. Those factors depend on the balance between stakers, masternodes, and many other conditions, but roughly, you will receive 2-3 PIVX as a reward for staking.
In the following paragraph, I will go over the requirements for getting started with PIVX staking, which are the same for both sub-coins. After that, I will specify the conditions for each of them in more detail.
Minimum Requirements
- Windows 7 / Linux (Preferably Ubuntu 14 and up)
- Installed PIVX Core Wallet
- At minimum 1 PIV/zPIV
- Minimum disk space of 12 GB
- 1 GB RAM
- No minimum or maximum internet speed
- A Static IP
- You need to keep the wallet online 24/7 (if you decide to log out of your wallet or shut down your PC, it will stop the staking process)
Summary: before you start staking you need to get a hold of those coins. I recommend registering on Coinbase, fulfilling the necessary KYC steps and depositing FIAT either by bank transfer or straight up via your debit card. After that, you can head over to Binance or Bittrex and grab the amount of Coins you want to stake. If you’ve done those steps, you can continue to the guides section which will help you to install the wallet, encrypt, backup and unlock your wallet or even optimize your staking process.
What Coin Version You Should Stake?
Before you are qualified to stake, it’s time to decide which version of the coin you’ll put your trust in: PIV or zPIV. In my opinion, the biggest difference between them is that zPIV’s anonymity works for all transactions and even staking. I consider it a great advantage, as you can stake without being analyzed and kept track of. Another crucial difference is the reward, which for zPIV is significantly higher (more to that later).
If you decide to stake zPIV, you need to transform your PIVs into zPIVs. Go in your wallet, click on privacy and choose how many coins you want to transform. Put that number in the field box and click on “mint zerocoin”. Something to be aware of is that for converting PIV into zPIV (or at some point the other way around), you must pay a small fee which is constant – 0,001 PIVX. The full amount of the fee depends on how many coins you are going to convert. The denominators are always for: 1, 5, 10, 50, 100, 500, 1000, 5000. Example: when you decide to convert 15 PIVs into zPIV, you must pay the fee of 0,001 PIVX twice – (1x 5 + 1x 10). For 45 PIVs that would mean a total of 0,005 PIVX – 4x for 40, 1x for 5.
Before we go in depth with the staking process itself, you should know, there are two different methods to start staking.
- Pivx-QT is the first method using a Graphical Interface (GUI) which is easier to use and recommended for most people. I recommend using it as it’s the most user friendly of the two.
- Pivxd is the one with a Command Line Interface (CLI) which is suitable for people with command line experience. CLI also uses fewer resources since it doesn’t require a graphical interface. This method is suited towards users using a Linux OS.
Graphical Interface PIVX-QT Wallet Setup
Step 1: Download & Install the Official Wallet
Head over to https://pivx.org/wallet and download the wallet for your Operating system.
Launch the file you just downloaded and install the wallet. The first time you launch the client it will ask you for a destination folder. That folder will be used to store the whole wallet.
Step 2: Encrypt Your Wallet
As with any other wallet, it’s always important to take measures to prevent unauthorized access. Go in your PIVX Core Wallet, click on “Settings” and click on “Encrypt Wallet”. You should see a new pop up which requires you to put in a passphrase. Make sure that you can remember the chosen one because that’s the only way you can unlock your wallet, send and receive money in the future. After you´ve typed in your password, the wallet itself will recommend saving that passphrase in a notebook or word file. Click on it and wait for your wallet to close itself.
Step 3: Back Up Your Wallet
Backing up your wallet data is more than significant. It is another way of protecting your access and therefore, your money. Here you have two options. Either you open “Settings” in your PIVX Core Wallet and click on “back up” (a new window will pop up, you must choose a location where to store the backup). The alternative is to copy the wallet.dat file and save it somewhere safe (USB stick, external drive, etc.). Never share this file with anyone – store it and make sure, that you are the only one who has access.
Step 4: Transfer Your Coins To The Wallet
One thing you should watch out for – when you receive your PIVX in your wallet, by default 10% of them will directly be converted to zPIV coins. If you don’t want to stake with zPIV, then disable the function or just change the amount of the percentage.
Time to transfer our coins to the wallet, but first we need an address. Click on “Receive” on the left side of your wallet. Type in something on “Label” and click “Request Payment”. Optionally you can type in something in the “Message” section that will remind you of the purpose of the address.
After you click on Request payment, a new window will pop up. Click on “Copy Address” and close the window. Go back to the exchange and send 1 PIV to that address. After you’ve confirmed that the coin you send to the address is being confirmed, you can send the rest of your coins to the address. This is done to avoid misspelled addresses or wrong copy of addresses.
Step 5: Unlocking Your Wallet
To finally be ready to stake PIV, you must wait for 101 confirmations from the network. For staking zPIV you must wait for 200 confirmations. You can easily check how many confirmations are already done by hovering with your mouse over the transactions. After the needed amount of confirmations, press “Settings” and click on “unlock wallet”. Choose “For anonymization and staking only”, type in your passphrase and click at “ok”. Now you should see a green arrow at the bottom. Congratulations, you are officially staking now!
If you don’t see a green arrow at the bottom of the wallet that means that something is not correctly configured. Go to Tools > Debug Window and type in:
getstakingstatus This command will show you which steps are incomplete and will help you understand where you need to make a change.
Command Line Interface PIVXd Wallet Setup
This method is mainly for people with slower machines or users who wish to spend as little resources as possible. Since we are not using the QT-wallet (GUI version), the whole process will revolve around command lines. If you are not comfortable with command lines, please use Method 1. I’m aware that most people are going to use this method on Linux based operating systems, so I’ll do this guide on Ubuntu.
Step 1: Download & Install the Official Wallet
Let’s download the wallet. Type in the following:
sudo apt-get install git -y
sudo apt-get install curl –y
curl –s https://api.github.com/repos/PIVX-Project/PIVX/releases/latest | grep browser_download_url | cut –d “” -f 4
These commands will show you the latest version of the official wallets. Since I’m doing this example in Ubuntu we will download the one which ends with tar.gz. Copy the link and use it in the next command.
wget <Paste the link which ends on tar.gz>
Example:
wget https://github.com/PIVX-Project/PIVX/releases/download/v3.1.1/pivx-3.1.1-x86_64-linux-gnu.tar.gz
After you’re done let’s unpack it and then remove the junk file.
tar -xvf pivx-3.1.1-x86_64-linux-gnu.tar.gz
This will unpack the files. Change the numbers if you have a newer version.
rm -rf pivx-3.1.1-x86_64-linux-gnu.tar.gz
With this step, you will remove the file which we unpacked. Be careful which pivx folder you remove. The one that ends with .tar.gz needs to be deleted. Time to launch the wallet. Type in:
cd pivx-3.1.1/bin
./pivxd -daemon
Keep in mind that the newest version at the time of writing this article is 3.1.1. Your version could be different depending on when you read the article. To be sure which version / folder you have you can double tap and the OS will fill in the rest:
cd pivx[double tap]
cd bin
./pivxd -daemon
Step 2: Encrypt Your Wallet
This command will encrypt your wallet. Replace [your password] with the password of your choosing. Type in:
./pivx-cli encryptwallet <your password>
The wallet will stop. You’ll need to launch it again.
Step 3: Back up Your Wallet
This step is extremely important and should not be skipped. To back up your wallet type in:
./pivx-cli backupwallet <Your selected folder / external driver / USB]>
Example:
./pivx-cli backupwallet ~/pivx-3.1.1/bin
Step 4: Transfer Your Coins to the Wallet
Let’s create a new address to which we will send the coins for staking. Type in:
./pivx-cli getnewaddress
You will receive an address. Go to the exchange where you have your coins and send exactly 1 PIVX to the address. After you confirm that the coins are on their way you can send the rest of your coins.
Don’t forget that you need 101 confirmations to be able to stake.
Step 5: Unlocking Your Wallet
Before we can start staking we need to unlock the wallet. Type in:
./pivx-cli walletpassphrase <passphrase> 0 true
<passphrase> – the passphrase you used to encrypt your wallet.
0 – the number of seconds which your wallet will stay unlocked. 0 means unlimited.
true – unlocked only for staking. And that’s it. You should be ready for staking. Now let’s check the status of your staking. Type in:
./pivx-cli getstakingstatus
This command will show you which necessary steps are done, and which are not. If you see “false” that means that that step is not configured or incomplete.
PIVX Staking Reward
Let’s have a look at the profitability of both coins. I’ll begin by going over the similarities between both coins.
Both reward systems can be compared to a raffle – the time and amount of your reward depend on a lot of different factors, which are not easy to predict.
For example, coin age. The longer you have your coins, the higher the chance to get the reward, as you’re seen as being more trustworthy. Always have in mind: when you do transactions with your coins, it means you are not holding them anymore, your coin age will drop to zero. In that line of thought, the weight of the network also plays a factor – the reward depends on the amount of PIVX (doesn’t matter if Piv or zPiv), which are staked now. In relation to that, we can also talk about the number of coins you own. Higher amounts mean a higher chance to receive rewards at regular intervals. You can see your stake in the transaction list and history.
Now you have an idea of how complicated and random the whole process is. On the PIVX network, a new block is being minted roughly every 60 seconds. The circulating supply is being increased with 6 PIV every block. The block rewards are split into 3 pieces. 1PIV of the reward goes automatically for the governance mechanism. The remaining 5PIV are split between staking nodes and masternodes but here’s where it gets tricky. The block reward depends on what kind of staking node will find the next block.
With all that being said let’s look into the differences between the Piv and zPiv staking rewards.
Piv
When talking about normal PIV staking we should expect to receive a smaller amount of reward. Since 1PIV of it goes to governance, we are left with the other 5, which are distributed to staking nodes and masternodes. As PIVX uses a custom See-Saw mechanism (which balances the rewards for stakers and masternodes), the developers have decided to give 2 PIV to stakers and 3 PIV to masternode operators. This is done as masternode operators need to stake higher amounts of coins.
Zpiv
I understand if you feel overwhelmed by the entire process. However, we’ve reached the interesting part about staking. Stakers of zPIV receive a higher reward compared to PIV stakers. Why is that you may ask? It provides an incentive for users willing to swap their coins for zPIV. With it people can make anonymous transactions without revealing their identity. But for this to work, people need to stake their zPIV since the transactions use zPIV denominators.
Now, about the rewards. When a zPIV staking node finds the next block it receives 3 zPIV instead of 2 PIV and masternode operators receive only 2 zPIV instead of 3PIV. Because of the nature of zPIV you can’t directly calculate how much you’ll receive in the end. You don’t know the exact number of private coins on the network and you can’t see your weight on the network.

How to Maximize Rewards
It’s only natural for you to wonder, whether there’s a possibility for rewards to increase. Honestly, there is no real possibility to increase rewards. You have two options, a) pool staking and b) coin control. Let us explain that more in detail.
-
Pool staking
- I want to be transparent – it doesn’t make sense, nor is it profitable. The basic principles of PIVX, privacy and anonymity are completely lost if you start staking in a pool, as you must share your information with others, which isn’t safe. Also, you must consider, that the requirement for staking PIVX is just one PIV, so there is no need to join a pool.
-
Coin Control
- Every time you receive a reward, it gets split into two equal pieces (well, most of the time). If you’ve staked 1000 PIV you would receive 2 blocks (UTXO) with 501.1 each. Don’t worry, your wallet sums up all the coins you received from staking. The use of coin control is to combine all those small rewards into one or several addresses. Those addresses will hold all the coins you want to stake instead of having them spread out in to separate blocks. Since they аre combined, there is a higher chance of being “chosen”, hence you receive your rewards more frequently than if you just left your coins sitting in smaller blocks.
I’ve asked one of the team members over on discord to give their own explanation. This is what I got:
“Coin control is just a method to check & select how to spend your UTXO in a more granular way. It actually doesn’t have much to do with staking at all but it can be used to “merge” your small / dustт UTXOs (e.g. combine 0.24, 1.342, 4.124 PIV into a single 5.7 PIV) so that each UTXO has a bit more weight. As staking is a random system, it technically doesn’t really matter what size UTXO you haveт but smaller the UTXO means you have less chance for that particular UTXO. So it just is more sensible to combine them into a larger size so that it has a better chance of winning a stake when it does get chosen.” Jakiman (Admin)
Checking Staking Status
Go to your wallet and click on Tools > Debug window and inside the console type in:
getstakingstatus
You’ll see different functions. Make sure all of them are “true” before continuing with the coin control. If not, go back to the beginning and compare the steps you did with the guide.
How to Enable Coin Control
It’s straightforward. Go to Settings > Options and click on the “wallet” tab. You’ll see “Enable coin control features”. Enable that function and click OK.
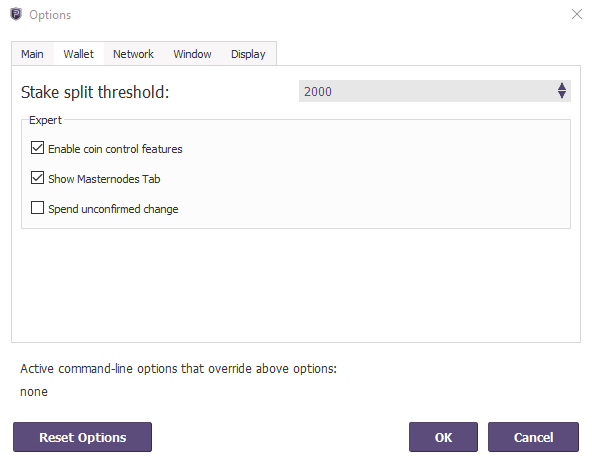
And you’re done.
Dust Control
Now, let’s gather all the blocks together since that’s the reason we enabled coin control in the first place.
Still confused? Yeah, I know. It’s hard to explain it with only text but let us continue.
Go to your wallet, click on receive and create a new address. To do this, you need to fill in a label on the top part of the wallet and click “Request payment”. It should look like this:
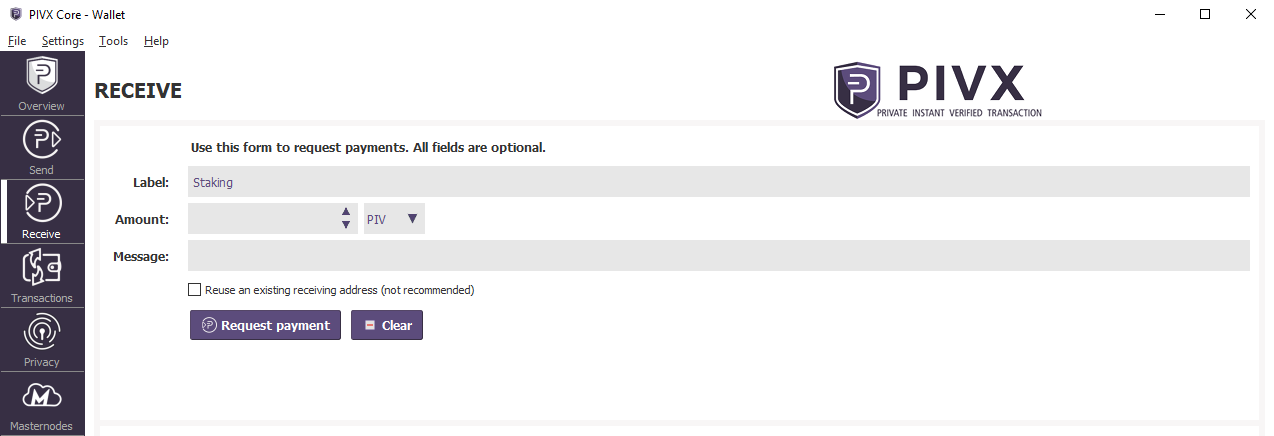
You’ve created a new address which will be your new “staking node”.
In the bottom part, you’ll see a line with date, label, message and amount. Click on the label, below it you will see a button “Show”. Click on it and you will see your address. Click Copy Address.
Alright, that’s done. Time to send all the small block payments to this address. Go to the Send tab and paste the address in “Pay to” section. If you pasted the address correctly the wallet should recognize that you created it and fill in the label. In case it doesn’t, COMPARE the addresses since there is a chance you’ve made a mistake. You should see something similar:
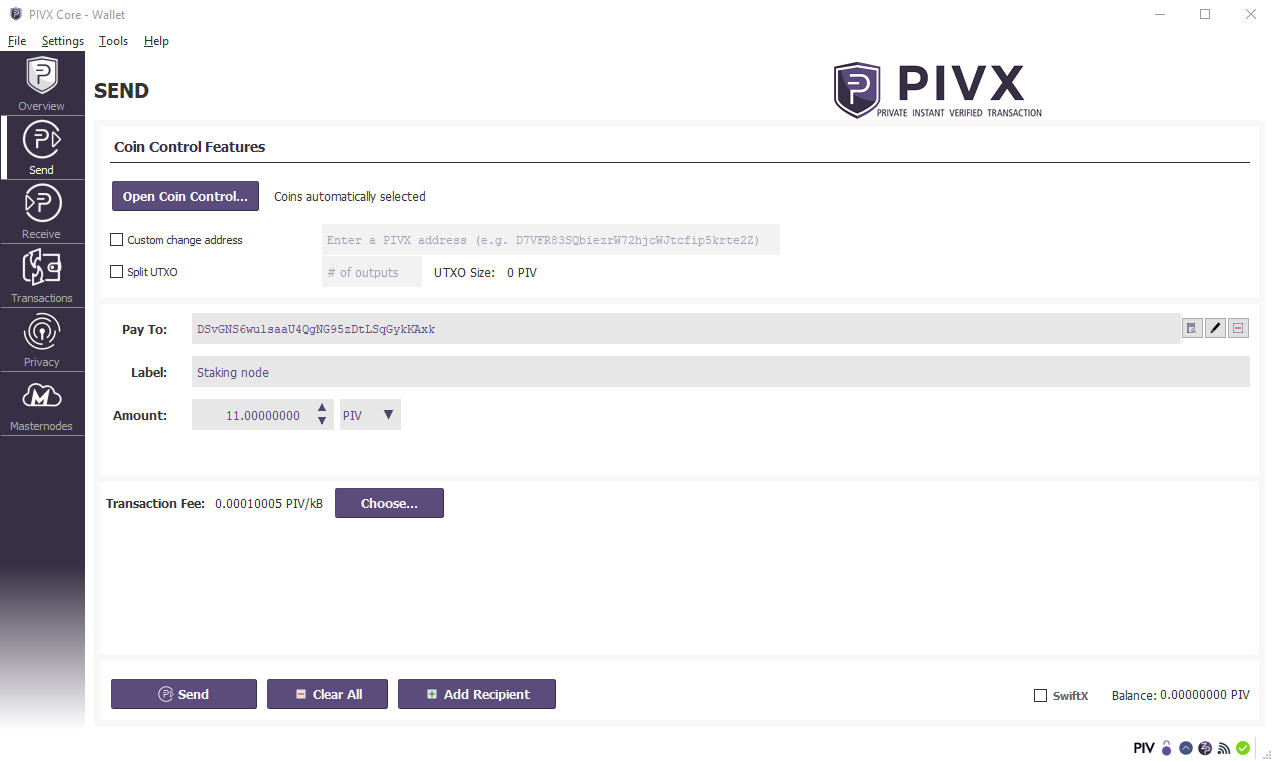
Now you should be able to see “Open Coin Control…” button in the top part of the screen. Click on it. A new window will open with all the block rewards you’ve received. If you don’t see anything doesn’t panic. That means, you’ve just recently started staking and you haven’t received any rewards yet.
Now click on “Select all” or just the ones that are a small number and click ok.

On the right side of the wallet, you will see the total number of coins you are going to send. Copy the number and paste it in the “Amount:”. Before you click send Read about “Splitting Outputs”.
Split Addresses
This is a trick almost no one talks about. When combining all the rewards you usually send them to one address. This is not a bad strategy but it’s not the most profitable one. Every time you hit a block your coin’s age get reset to 0 and you must wait for the coins to mature. For PIV staking as an example, you’ll need to wait for 101 confirmations to begin staking again.
If you have 1,000 PIVX coins staked, you should receive a reward on average every 23,040 blocks (around 16 days). If you have two addresses with 500 PIVX staked, you should receive a reward on average every 46,080 blocks (around 32 days) but two times (since you are staking from 2 addresses).
The only benefit seems to be that you are not waiting for the maturity period. It may not look that important but it’s still an optimization you can do.
After you’ve selected all the small rewards that you received, you will see a button “Split UTXO”. If you want to use this option enable it and on the right side enter the amount of staking blocks you want to have. There is no exact sweet spot that will give you the best ROI% but after sniffing around discord I’ve noticed that most people have between 250 and 500 PIV per staking block. After you’re done with that you can click on “Send”.
And you are done. You’ve just sent all your small block rewards to the new address/addresses. This will increase the chance of getting a reward which will in return increase the passive income you receive.
It’s a good idea to do this every 2 or 3 months, to increase the chances of getting a reward.
Figure out Your Profit With the PIVX Staking Calculator
Finally, it’s time for an example. Like I already mentioned, it is hard to give you a precise and detailed answer on how much you’ll get by staking PIVX. Still, I want to show you a convenient calculator, which can give you an overview. Keep in mind it only works for staking PIV and not to zPIV, as we have no way of knowing the size of the network, because of anonymity.
FAQ
To stake PIVX you must have your wallet open 24/7, which translates into electricity costs. With the help of a raspberry pi, you can reduce the expense, but I would not recommend it. It makes no sense to buy a device for around 35$ and the needed SD card for at least another 10$. However, if you already have both, you can surely use it. You must take into account the fact that with more than one staking node, your raspberry pi will heat up.
It depends for which coin you have decided. To be able to stake PIV you need 101 confirmations, for zPIV you need 200 confirmations. Both depend on the activity on the network and having that in mind, I can´t give you a specific time frame. But don´t worry, it will not take long. You can see your status of staking at the bottom of your wallet.
But just to clarify that when it comes to staking (or even mining solo), it’s a luck-based game. Just because the calculator / your calculations tell you that you should receive a reward every 14 days doesn’t necessarily mean you’ll receive them on that date. You might receive them after 10 or after 20 days.
Earning passive income is always worth it, right? For sure, you must calculate the amount of money you’re going to spend on electricity. Even when your reward depends on so many facts, with a specific amount of PIV´s you will make a profit. To get a good idea on how much you need, use the calculator.
With the new update we have to say, that staking zPIV is more profitable. In comparison: PIV stakers will receive around 2PIV per each new block, so every 60 seconds, the network will receive 3 PIVs. But, with zPIV, the staking community will receive 3 zPIV per 60 seconds.
PIVX doesn’t have a maximum supply. You create new coins using the staking function – to infinity. There could be a hardfork for setting a limit at some point in time. Not having a maximum provides inflation, which in this case is 4% each year. The inflation is solved while these coins will be received by the PIVX holders, to balance the inflation.
PIVX is one of the most secure PoS networks with a pretty fast block time (60 seconds). While staking that coin, you earn money while supporting the network.
This can have many different reasons. You can check step by step what could have gone wrong by following the link: https://pivx-faq.github.io/pivx-faq/#why-isnt-staking-working
About PIVX
PIVX (private, instant, verified, transaction) is a proof of stake coin which is based on an open source decentralization and privacy at the same time. It was launched on February 2016, but back then it was called “Darknet” (DNET).
Unique Selling Points
PIVx differentiates itself from other cryptocurrencies by being a double coin network. Users can choose between the standard PIV and the private coin zPIV, which provides anonymity to the one sending or staking it. On top of that, the team have developed a new zPoS system which changes the rewards given out depending on what type of node is staking.
Team
Two members of DASH Currency wanted to make an improvement, so they founded PIVX. They modified the original proof of work from DASH to a proof of stake system. In addition to that, both members wanted to have a better reward system, therefore, they decided on the see-saw mechanism, which is responsible for balancing the payouts of the rewards between masternodes and staking.
The Network
The network of PIVX is aware of the future, it is long lasting and somewhat self-funding. By being decentralized, PIVX’s network is secured by an impressive number of nodes, which are the uses themselves. The idea is that every crypto user should have the possibility to be involved and able to make a change in the crypto world. Having that in mind, the coin belongs to the next generation of cryptocurrencies. PIVX is a rare find, considering it combines anonymity, privacy, cheap and fast payments in one.
Privacy
The special thing about PIVX is the privacy of transactions. You have the option to convert your coins to zPIV, which uses the same blockchain. The difference is, that no one can track your transaction history or your holdings. That level of anonymity is possible with the help of the zerocoin protocol.
Future
There are different plans, although nothing is certain. There’s talk about a release of zDeX (decentralized exchange on the PIVX platform). We may even come across shared masternodes, or even staking pools.
Useful Weblinks
- Official Website: http://www.pivx.org
- Announcement Page: https://bitcointalk.org/index.php?topic=1262920
- GitHub: https://github.com/PIVX-Project/PIVX
- Block Explorer: https://chainz.cryptoid.info/pivx
- Whitepaper: https://pivx.org/pivx-white-paper
- Socials:
- Twitter Discord Telegram