Nexus Staking – Everything You Need to Know
Staking Nexus (NXS) provides security for the network while the stakers receive rewards for doing so. The main aims of the network are to constantly improve the speed, scalability, security, and accessibility of the blockchain while providing a great incentive to its users to support them.
The Nexus network is quite unique due to it using 3 channels to confirm transactions and blocks on the blockchain, while most other coins use only one channel, which is their PoW or PoS consensus. It has both of the consensus mechanisms divided on the three channels, which are – PoW optimized for mining with a CPU, PoW optimized for mining with a GPU and a PoS channel. While other cryptocurrencies like Bitcoin need to have difficulty adjustments, Nexus can react to each block and all three channels are independent from each other. A notable feature for the security of the network is that every 60 minutes, a checkpoint is created, and even malicious users cannot change blocks prior to the checkpoint even if they managed to succeed with an attack.
In this article, you’ll learn how to stake Nexus, which wallet to choose and how to properly configure it for optimum income rate.
Pros & Cons
- The network has 3 consensus channels – Prime Channel (for CPU mining), Hashing Channel (for GPU mining) and a Nexus Proof of Holding Channel (nPoH), which is actually the Proof of Stake consensus channel
- Nexus uses a combination of multiple hashes that include Keccak-1600, Skein-1024, SK-576, SK-512 and SK-256
- For increased security, the network supports 571 Bit private keys using NID_sect571r1 as the algorithm
- The design of the Nexus QT wallet is dated
- You start the staking process with a very low profit
How to Stake Nexus
Staking Nexus is done via the core wallet just like in many other different currencies. While in other networks, like Bitcoin, there is a shortage of nodes, which makes the system slower and can even compromise the decentralization, Nexus has made it possible for users to receive freshly minted coins. All you need to do Is just hold your Nexus and keep your wallet online 24/7 and occasionally, you will find a block and receive a reward.
I recommend having at least 1000NXS coins in your wallet for staking. While it is not impossible to stake with less, your chances will be lower, and it might take a long time to find a block. This is because Nexus is built on trust and it takes time to build up. It is generated by the number of coins in your wallet and the time you keep your wallet online. If trust is lost, the interest is reset back to 0.5% per year.
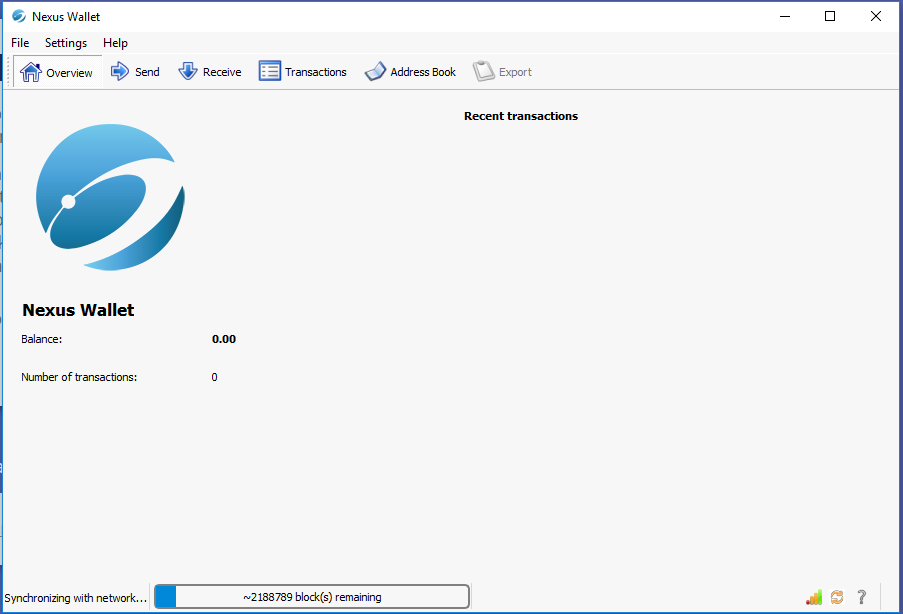
Once you install the wallet and it is fully synchronized and encrypted, you can begin the staking process by unlocking the wallet for Minting. You can tell that the staking process is starting when the question mark icon in the bottom right of the window turns to a clock icon. The first reward you receive will be a Genesis transaction, which will build your initial trust key in the network and you stake with that key. It is a good idea to back up your wallet right after the Genesis transaction in order to add an additional layer of security for your funds. All of this sounds great but let me not get ahead of myself and cover the minimum requirements you need to take into consideration before starting your Nexus staking journey.
Minimum Requirements
- You will need a 32 or 64 bit Windows OS, Linux or OSx
- Download and install the Nexus QT wallet
- At least 4GB free hard drive space
- A minimum of 1GB RAM
- There are no minimum requirements for your connection
- Keep the device hosting the wallet online 24/7
Summary: Of course, besides the things I mentioned above, you will need NXS coins so that you will be eligible to stake. You can obtain them either by mining or buy them from exchanges like Binance, Bittrex or Cryptopia. You must not forget to install the Nexus QT wallet as only that wallet will let you stake your holdings. Send your coins to it and make sure to encrypt, backup and unlock the wallet for staking.
Nexus Wallet Setup (GUI)
Step 1: Download & Install the Official Wallet
You can download the official Nexus GUI wallet (NexusQT) from the the official Github repository. Make sure to choose the latest version for the correct type of OS that you have installed.
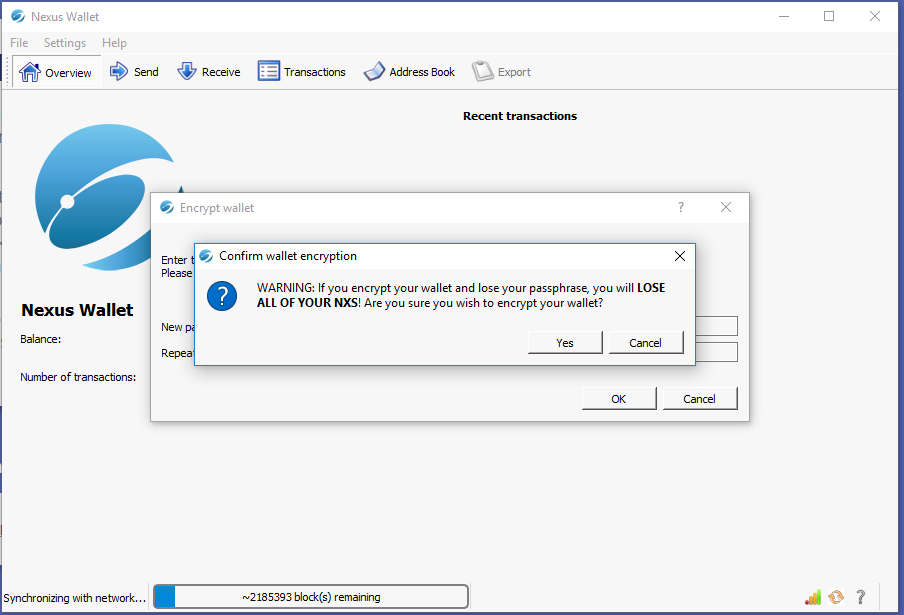
Step 2: Encrypt the Nexus Wallet
One of the most crucial steps, before you begin staking Nexus, is encrypting your wallet for increased security. Also, if it is not encrypted, the staking option will not be available. You will need to click on the Settings menu and choose the Encrypt Wallet option. It will ask you to enter a passphrase that you should remember and after you click OK will show you a confirmation window. The wallet will shut down and you must re-launch it again.
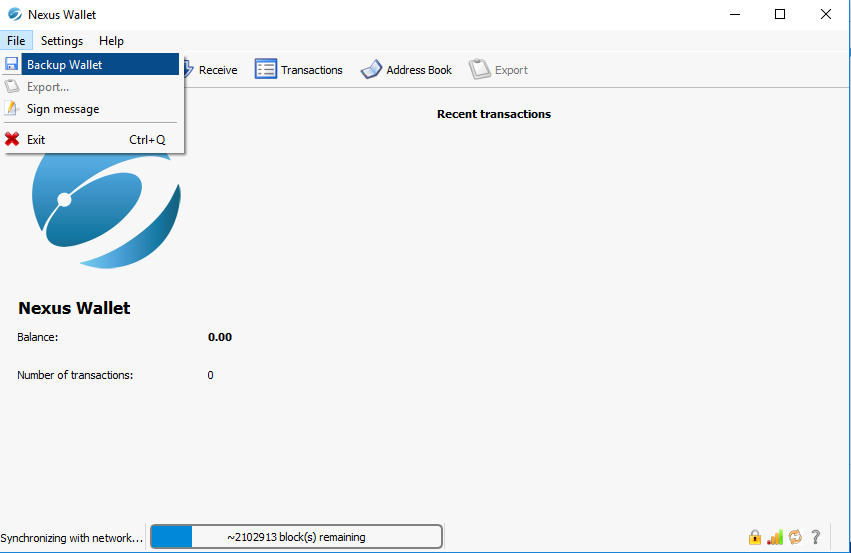
Step 3: Backup The Nexus Wallet
It is very important to make a backup for your wallet as that adds an additional security layer for your funds. You can do that by choosing the File menu and clocking Backup Wallet option. You can write a file name of your choosing along with path and click Save.

Step 4: Create a Wallet Address
You will need to create a new wallet address, so you can send your funds to it. Click on the Receive option and then click New Address. You must enter a label and your passphrase in order for the new address to be created.
Step 5: Transfer Coins to the Wallet
It is time to send your coins to the newly setup Nexus wallet. I recommend you send at least 1000 NXS for staking as lower than that won’t be worth it as it gets harder to maintain your trust level in the network. Losing trust lowers your earnings substantially.
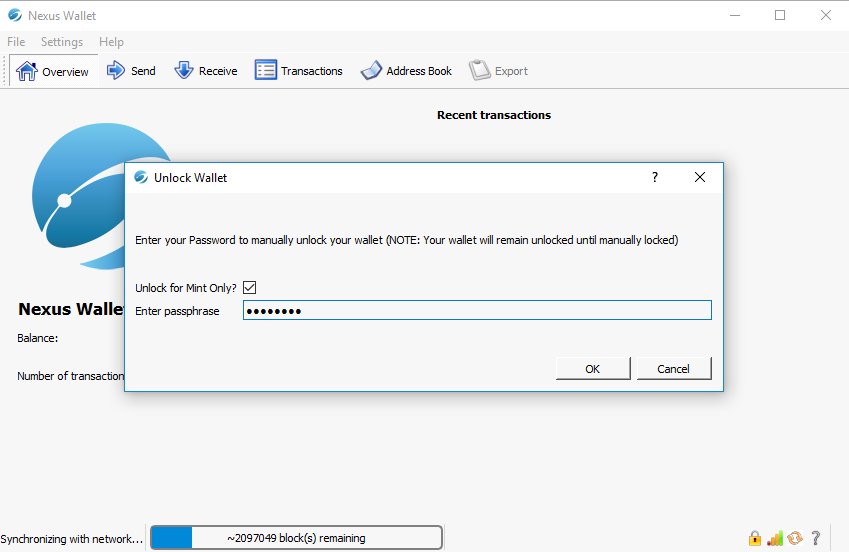
Step 6: Unlock Nexus Wallet
To enable the staking process of the wallet, you will need to unlock it. Click on the Settings menu and choose the Unlock Wallet option. It will ask you for your passphrase and make sure to select “Unlock for Mint Only”. That’s it, you’re officially staking Nexus now.
Staking with the Command Line Wallet (CLI)
Step 1: Download & Install the Official Wallet
First, you will need to download the wallet. Follow the guide below:
sudo apt-get install curl –y
curl –s https://api.github.com/repos/Nexusoft/Nexus/releases/latest | grep tag | cut –d ‘”’ -f 4
These commands will show you the latest version of the official wallets. Since I am doing this example in Ubuntu, I will download the one which ends with tar.gz. Copy the link and use it in the next command.
You’ll see the tag number of the last release. Now type in:
wget- Paste the link which ends on tar.gz
Example:
wget https://github.com/Nexusoft/Nexus/archive/[The number you received above].tar.gz
Example:
wget https://github.com/Nexusoft/Nexus/archive/2.5.4.tar.gz
This will download the source file in a tar.gz format. You will need to make a folder. Type in:
mkdir - Enter then name of the folder you want to store your wallet at
Example:
mkdir nexus
After you’re done with that, type in:
ls -a
This will show you all the files in the folder you are. You should see a red text with the number of the release. That is the file needed. Type in:
tar -xzvf [The number of your release tag] – The folder you created for your nexus wallet
Example:
tar -xzvf 2.5.4.tar.gz ~/nexus
Now, remove the .tar.gz file. Type in:
rm -rf / the release tag
Example:
rm -rf 2.5.4.tar.gz
Now to launch the wallet. Go to your wallet. In my case it is in root, so the path would look like this:
cd ~/nexus
Now it’s time to compile the wallet. Type in:
make -f makefile.cli
This will start compiling the necessary files needed for your wallet to run. Give it a few minutes to finish. After its done, type in:
./nexus
After a few seconds, it will warn you that you haven’t set a rpcuser and rpcpassword. Don’t worry, this is normal. Type in:
cd ~/.Nexus
nano nexus.conf
Here you need to type in the following:
rpcuser= Replace with a username
rpcpassword= Replace with a password
staking=1
After you’ve typed in the text and replaced the needed information click ctrl+x, y and then press Enter.
After you’re done with that you can go back to the folder where your wallet is. In my example it is in:
cd ~/nexus
Now its time to launch the wallet. Type in:
./nexus -daemon
In case you get the same error involving rpcuser and rpcpassword, go back to ~/.Nexus and check if the filename is nexus.conf
Step 2: Encrypt Your Wallet
On to the next crucial step – encrypting the wallet. Use the command below and replace
./nexus encryptwallet - your password
Do not forget your passphrase, because there is no way to recover it. If you lose it, you lose all your funds in the wallet.
After you’ve typed in the command above with your passphrase, the wallet will shut down. In order to re-launch it, type in:
./nexus -daemon
Step 3: Backup Your Wallet
This step is extremely important and should not be skipped. This will add an additional layer of security to your funds. To back up your wallet type in:
./nexus backupwallet Example: ./nexus backupwallet ~/nexus
Step 4: Transfer Your Coins to the Wallet
You need to create a new address to which you will send the coins for staking. Type in:
./getnewaddress getnewaddress
You will receive an address. Go to the exchange where you have your coins and send exactly 1 NXS to the address. After you confirm that the coins are on their way you can send the rest of your coins.
Step 5: Unlocking Your Wallet
Before you can start staking, you need to unlock the wallet. Type in:
./nexus walletpassphrase - passphrase 0 true
<passphrase> – the passphrase you used to encrypt your wallet.
0 – the number of seconds which your wallet will stay unlocked. 0 means unlimited.
true – unlocked only for staking.
And that’s it. You should be ready for staking.
You should make sure that the wallet is staking. Type in:
./nexus getinfo
With this command, you can see if you are staking. In the label “staking” you should see the number of coins which are being staked at the moment.
Nexus Staking Reward
There are many variables that affect Nexus staking rewards. As I mentioned earlier your first reward for staking will be a Genesis transaction that will make your trust key for the wallet, which you will be using for future staking from that point on. One of the variables that will be affecting your future staking success is the Interest Rate or also called Minting Rate. You can see the annual interest rate in % in your wallet UI if you are using the GUI wallet and it starts at 0.5%, which can increase to 3% within 12 months if you have not lost any trust. Based on that trust, comes the second factor – Trust Weight. This is an indicator of how much the network trusts you as a node. It increases much faster than the interest rate and it affects every other variable.
On to the more interesting things to consider when you want to know what can change your rewards. One of them is the Block Weight. This is somewhat unique to the Nexus network and after the Genesis transaction, this value will start to increase steadily, reaching 100% after 24 hours. Every time you receive a reward from staking, the block weight resets. When it reaches 100%, your trust key expires, and everything resets. After that, you will be waiting for a new Genesis transaction. The final crucial factor to take into consideration is Stake Weight. This variable is calculated from your Trust weight and Block weight.
How to Maximize Rewards
There are no known shortcuts or tactics that will increase your rewards when staking NXS. The only thing you can do is make sure you are staking at least 1000 NXS in the wallet and that you are keeping it online all the time. It takes a long time to increase your annual ROI percentage, so you should make the most of it and don’t have downtime.
Figure out Your Profit with the Nexus Staking Calculator
Of course, everyone would like to calculate their winnings before they invest in any project. For that purpose, you can use the calculator below to calculate your earnings. Just please keep in mind that with the random nature of staking in general, the results from the calc are rough estimates.
You can see the ROI percentage in your wallet next to your NXS balance. It starts at 0.5% and it will grow to 3% after 12 months. If you are staking 1000 NXS and have the full 3% ROI after 12 months, you can expect something in the ballpark of 1.25 NXS coins per month as rewards.
FAQ
Yes, you can. The Nexus network has three consensus mechanisms, one of which is Proof of Work.
Yes, you can use the Raspberry Pi, but I would not recommend it. It is an investment in hardware and you would have to use the more complex CLI wallet for it.
The interest rate varies and within one year it can reach 3% if you build trust on the network.
The max supply of NXS coin is 78 million units.
Because it is one of the most unique projects in the world that offers three consensus methods and great security.
Please try to re-trace your steps while looking at the wallet installation guide.
About Nexus
The vision of Nexus is to improve on the Bitcoin protocol and at the same time clear the crypto sphere out of scam coins. The lead developer Videlicet studied how Bitcoin was structured and what Satoshi wanted to achieve with the project and found ways to improve it. At that moment the market was flooded with scam coins and the so-called pump and dump schemes. From his vision, Coinshield (CSD) was born. Later named Nexus, it implemented three channels to the blockchain, each with its own consensus mechanism, offering a unique and secure experience for all users.
Unique Selling Points
The Proof of Holding channel is the third security channel of the network where users can stake their coin holdings to support the network. All three channels on Nexus make 51% attacks near impossible and providing great options for everyone.
Team
The before mentioned Videlicet, also known as Colin Cantrell, is the founder and lead developer of the Nexus project. He first named this project Coinshield in 2014 and later in 2015 the team rebranded it to Nexus. Colin started one of the most, if not the most, ambitious projects in the crypto world. With the plans to replace Bitcoin as the titan of crypto and a dedicated team behind its back, Nexus is gaining speed and popularity at an increased pace.
Network
The most unique quality of the network is the three consensus channels. This makes the blockchain adapt to transaction volumes and traffic, allowing it to organically scale and meet the demands of the network. Each node on the network makes the system even faster.
Privacy
The privacy aspect of the network is similar to what BTC offers. It is not a private or anonymity focused coin and for now, there are no plans for implementing that. The team behind Nexus is also developing a framework under the name Lower Level Library (LLL), which incorporates new technology for cryptography, protocol, and database.
Future
The future for the Nexus coin entails constant development and updates to the network. The current known features that will be implemented in the future are improvements on the smart contracts, mobile wallets, a new modular user interface, enhanced quantum resistance, better scaling etc. If you would like to know more about its future, you can visit their official web page.
Useful Weblinks
- Official Website: https://nexusearth.com
- Announcement Page: https://bitcointalk.org/index.php?topic=657601.0
- GitHub: https://github.com/Nexusoft/Nexus
- Block Explorer: https://nexplorer.io
- Whitepaper: https://nexusearth.com/nexus-white-paper
- Socials:
- Twitter Discord Telegram Reddit Facebook